As you stand before a display case looking at the curve of a blade and the white line of its edge, the question arises: “How was this made?” There is no need to memorize the process in detail. At which stage did who take on what, and where is the result visible now? Once you grasp that correspondence, there are more places for your eye to rest, even on the same sword. Here we trace the flow from materials to mountings as a guide to appreciation.
Making iron and making swords are separate jobs
First distinguish two separate specialisms: producing iron and making a blade from it. Tatara is iron production using iron sand and charcoal; the high-quality steel portion produced is described as tamahagane. The Society for Preservation of Japanese Art Swords' Nittoho Tatara preserves the technique, trains successors and distributes tamahagane and other materials to swordsmiths (Japanese Sword Museum: Tatara Operations and Nittoho Tatara).
Tamahagane is the name of the material a sword is made from, and at the same time it is an achievement sustained by a separate craft. If you have the chance to see a lump of the raw material on display, it is worth remembering the impression of that rough, craggy lump. The gap between it and the polished blade becomes, just as it is, the weight of the processes that follow.
Selection and Forging — The Stage of Judging the Material
A swordsmith begins by selecting the raw material. Forging, construction, shaping and quenching follow, with methods varying by period, school and individual (Japanese Sword Museum: Swordmaking and Polishing). There is no universal sequence that is the sole way to make every Japanese sword.
The folding that is so often talked about is likewise not a simple yardstick on which more folds mean higher quality. How to read the nature of the material, and where to stop. The accumulation of those judgments remains as the character of the jigane (the ground area of the blade). When viewing, rather than imagining the number of folds, it is more rewarding to put into your own words impressions such as whether the grain of the ground looks fine and tight, or looks as if it is flowing.
Shaping and Quench Hardening — Where the Form and the Hamon Are Set
At the shaping stage, the overall outline of the blade, such as its length, its curvature, and the shape of the kissaki (point), is settled. The quench hardening that follows is a process that produces a difference in properties between the edge side and the ground side, and the scenery of the white pattern called the hamon also originates here. The specific conditions of the work are the craftsman’s domain, so those of us who view simply and quietly receive the result.
The knack when looking is not to see the hamon as a flat “pattern.” Is it close to a straight line, or does it undulate widely? Is the boundary between the edge and the ground crisp, or is it blurred like mist? Shift your standing position a little and check whether the appearance changes. The areas that look white depending on the polish and the way the light falls are not simply the same as the boundary of the hardened edge, and depending on the viewing conditions they can feel like a layer different from a flat pattern.
Polishing and Mountings — Another Specialty That Draws Out the Beauty
Even after a blade has been formed, its steel surface and temper pattern are not fully revealed. Polishing is a specialist skill that brings out the sword's beauty. The craftsperson who forges tamahagane into a blade is the swordsmith; the craft continues through the polisher and specialists in mountings (Setouchi City: Swordsmiths). Owners are not advised to polish or disassemble their swords themselves. Handling decisions are entrusted to specialist craftspeople and institutions.
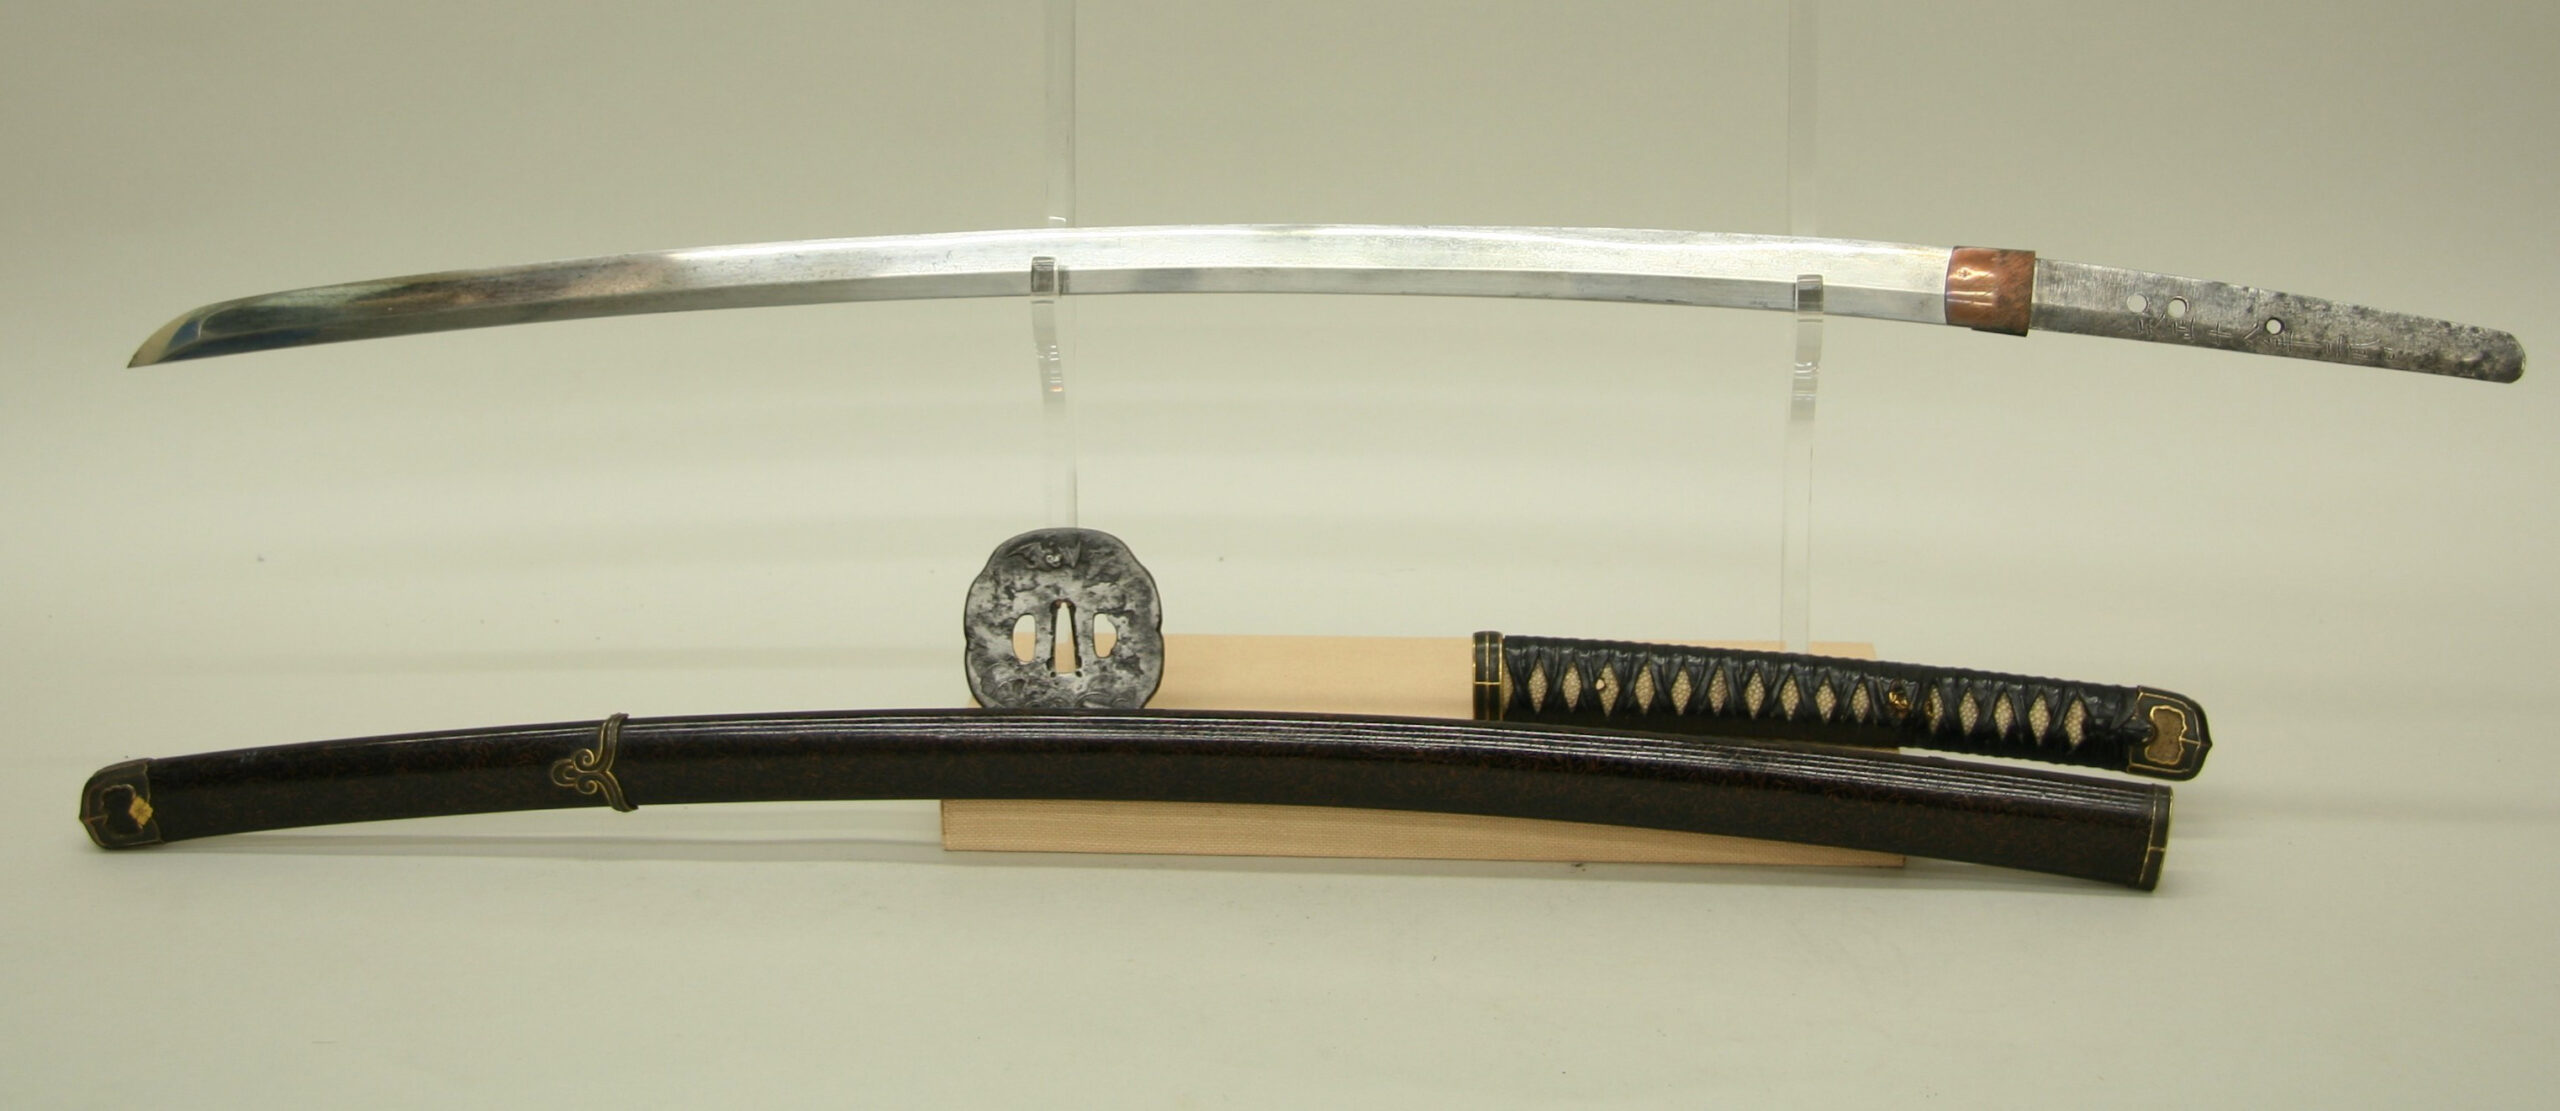
Visible in the photograph: the blade is supported horizontally, curving gently toward the point, with the tang exposed and holes visible at the base. Scabbard, hilt and guard lie separately in front, displaying different textures: glossy dark-brown scabbard, cord wrapping and metal surfaces. Museum record: blade and exterior assembly comprising scabbard, hilt and guard (object X.11). Source: The Met (CC0). Shown as an example of a completed blade and mounting, not a documentary photograph of production. The Metropolitan Museum of Art, Open Access (CC0) / Collection Record
Mountings bring together several specialisms, including scabbards, hilts and guards. They may have been made at a different time from the blade or replaced to suit an owner's taste. Ways of viewing them are also discussed in Mountings and Sword Fittings.
Stage
Craft mainly responsible
What becomes visible on display
Selection of raw material
Iron smelting / swordsmith
The foundation of the texture of the jigane
Forging / tsukurikomi
Swordsmith
The character of the grain of the ground
Shaping
Swordsmith
The overall form; the shape of the kissaki
Quench hardening
Swordsmith
The scenery of the hamon
Polishing
Polisher (togishi)
The return of light; the boundary between ground and edge
Making of the mountings
Scabbard, hilt, metalwork, and other trades
The combination of design and materials
* These correspondences are a rough guide. More than one process is involved in any single visual effect.
An Order of Viewing That Recalls the Processes
At the venue, try using the order of the processes directly as the order of your gaze. First, stand back and look at the overall form. This mainly involves the shaping stage (quench hardening is also said to affect how the form comes out). Next, move closer and look at the grain of the ground. This is the result of forging and tsukurikomi. Then trace the hamon. This is the result of quench hardening. Finally, change your angle and look at how the light returns. This is the result of polishing. If mountings are displayed alongside, take your time looking at them last, as the work of other trades.
Three lines are enough for observation notes. On the first line, the overall impression; on the second, what you noticed in the ground and the hamon; on the third, the feel of the materials of the mountings. It does not matter if you do not know the proper names. What calls for care here is not to decide the maker, the date, the authenticity, or the value from the patterns you saw or the impression of a photograph alone. Those belong to a domain examined through separate procedures and documents, and thinking of them apart from the enjoyment of viewing actually lets you look more at ease.
I think the benefit of knowing the processes lies less in gaining knowledge than in becoming able to imagine how many people’s time has accumulated in the single sword in front of you. The next time you enter an exhibition room, try, just once in front of the blade, recalling the iron as it was when it was still raw material.
On a display-case label, a good deal of information is packed into one short line, such as “Tachi, mei ◯◯ (gō ◯◯).” The maker's name, the characters inscribed, the name given in parentheses—these are not the same kind of information. This article sets out the steps for reading a label line by dividing it into its separate fields. It is not about judging authenticity or about selling; it is an article for calmly reading the label in front of you.
A Single Label Line Is a Bundle of Information
Kyoto National Museum explains that tang inscriptions can include not only the maker but also residence, production date, later appraisal or alteration history, and owner information (Kyoto National Museum). Mei therefore does not mean only a swordsmith's signature. Conversely, a personal name in an object's title is not necessarily inscribed on the sword.
Reading Field by Field
Whether there is an inscription, and whose work the sword is considered to be (attribution), are separate pieces of information. If you first separate these two, the remaining fields also become easier to sort out.
Type of information
Clues on the label
Points to note when reading
Presence or absence of an inscription
“Mei ◯◯” / “Mumei” (no inscription)
Information on whether characters are inscribed or not. An attribution may be given even when the sword is mumei
Attribution
The name in the maker field; qualifying expressions such as “den” (attributed to)
Separate information from the presence or absence of an inscription. The maker field is sometimes blank
Date inscription (nenki)
An inscription of a date in the form “year ◯◯, month ◯, day ◯”
Read the era name, month, and day as originally written. Do not confuse months and days of the old lunar calendar with the modern calendar
Gō / meibutsu name
“Gō ◯◯” or “Meibutsu ◯◯” in parentheses
A name that distinguishes one particular blade. A separate field from the maker's name
Later records
“Kinzōgan-mei” (gold-inlaid inscription)
Kinzōgan-mei is the name of a technique in which an inscription is applied by inlaying gold. Check the explanation for who recorded it and when
Example 1: The Mei and the Gō Are in Separate Fields
Kyoto National Museum's published object list includes the entry 太刀 銘 波平行安(号笹貫), “Tachi, mei: Naminohira Yukiyasu (gō: Sasanuki)” (Kyoto National Museum). The mei in the first part gives the characters inscribed on the sword; the gō in parentheses is the name that distinguishes this particular sword. Reading Sasanuki as the maker's name would shift the information by one category.
“Katana, kinzōgan-mei Honda Mino no Kami shoji / Yoshihiro Hon'a (kaō) (meibutsu Kuwana Gō),” from the same list, is an example to be read in still finer divisions. “Kinzōgan-mei” refers to the way the inscription was applied (the technique); “Honda Mino no Kami shoji” is information about ownership; and the kaō in “Hon'a (kaō)” is a kind of signature. Technique, ownership, and signature are each separate pieces of information, and they cannot be lumped together as the same thing as a signature inscribed by the swordsmith himself.
Example 2: “Mumei” and a Meibutsu Name Coexist
Kyoto National Museum's collection database lists an unsigned katana named Meibutsu Shimazu Masamune, dated to the Kamakura–Nanbokuchō period, 14th century (Kyoto National Museum Collection Database). A celebrated sword name can be passed down without an inscription. Do not equate a personal name in an object title with characters on the actual blade: this is fundamental when reading unsigned works. For unsigned swords themselves, see Can an Unsigned Japanese Sword Be Sold?.
Example 3: The front and back serve different roles
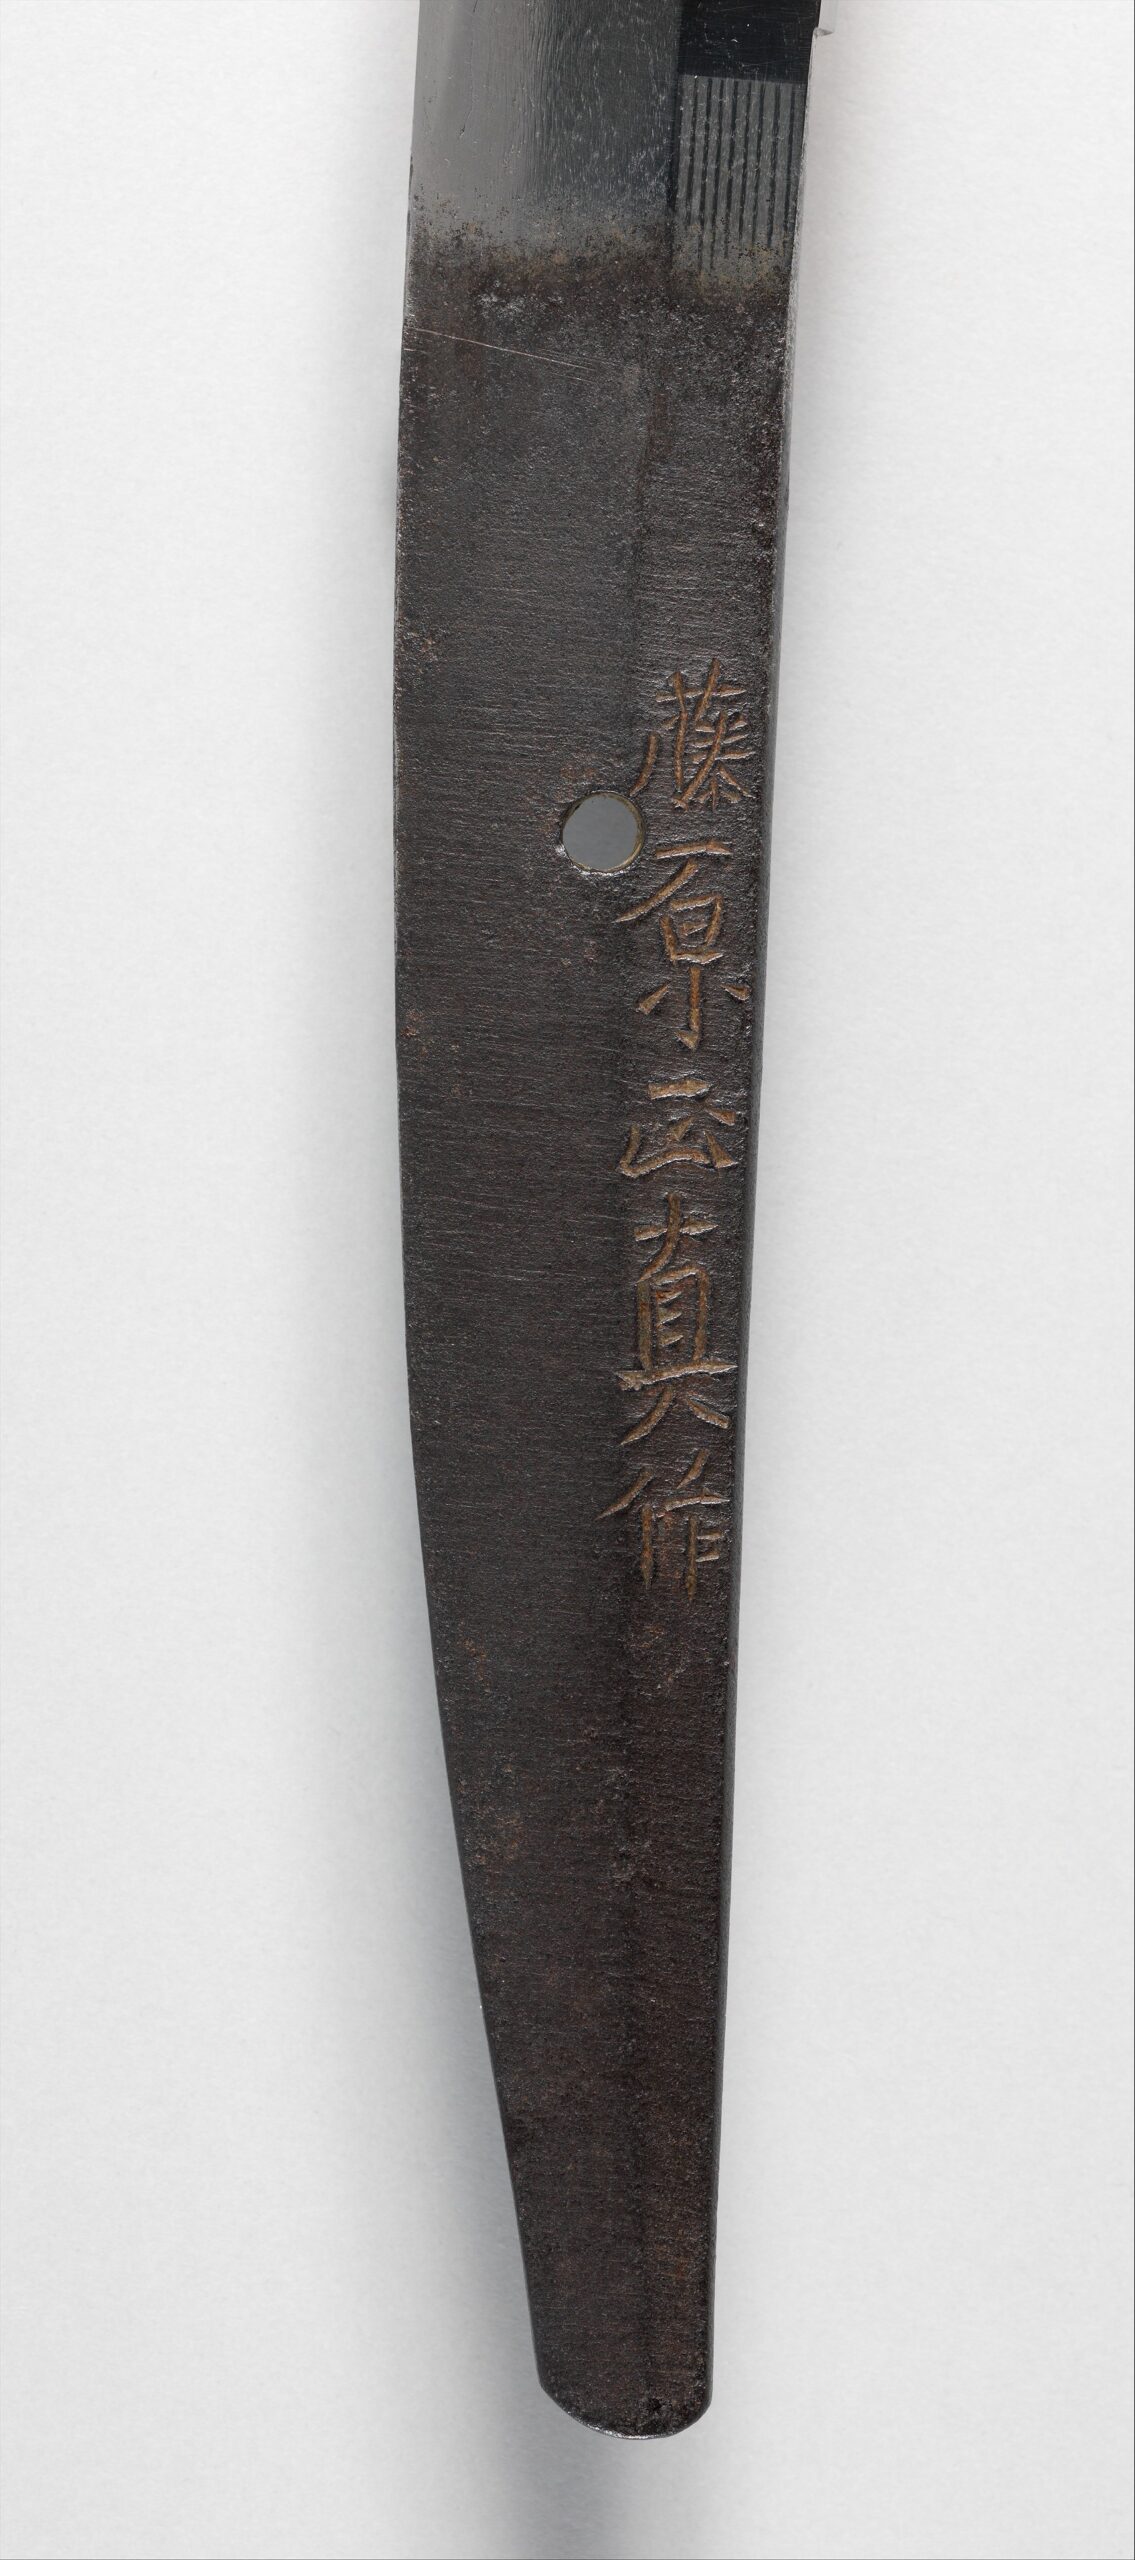
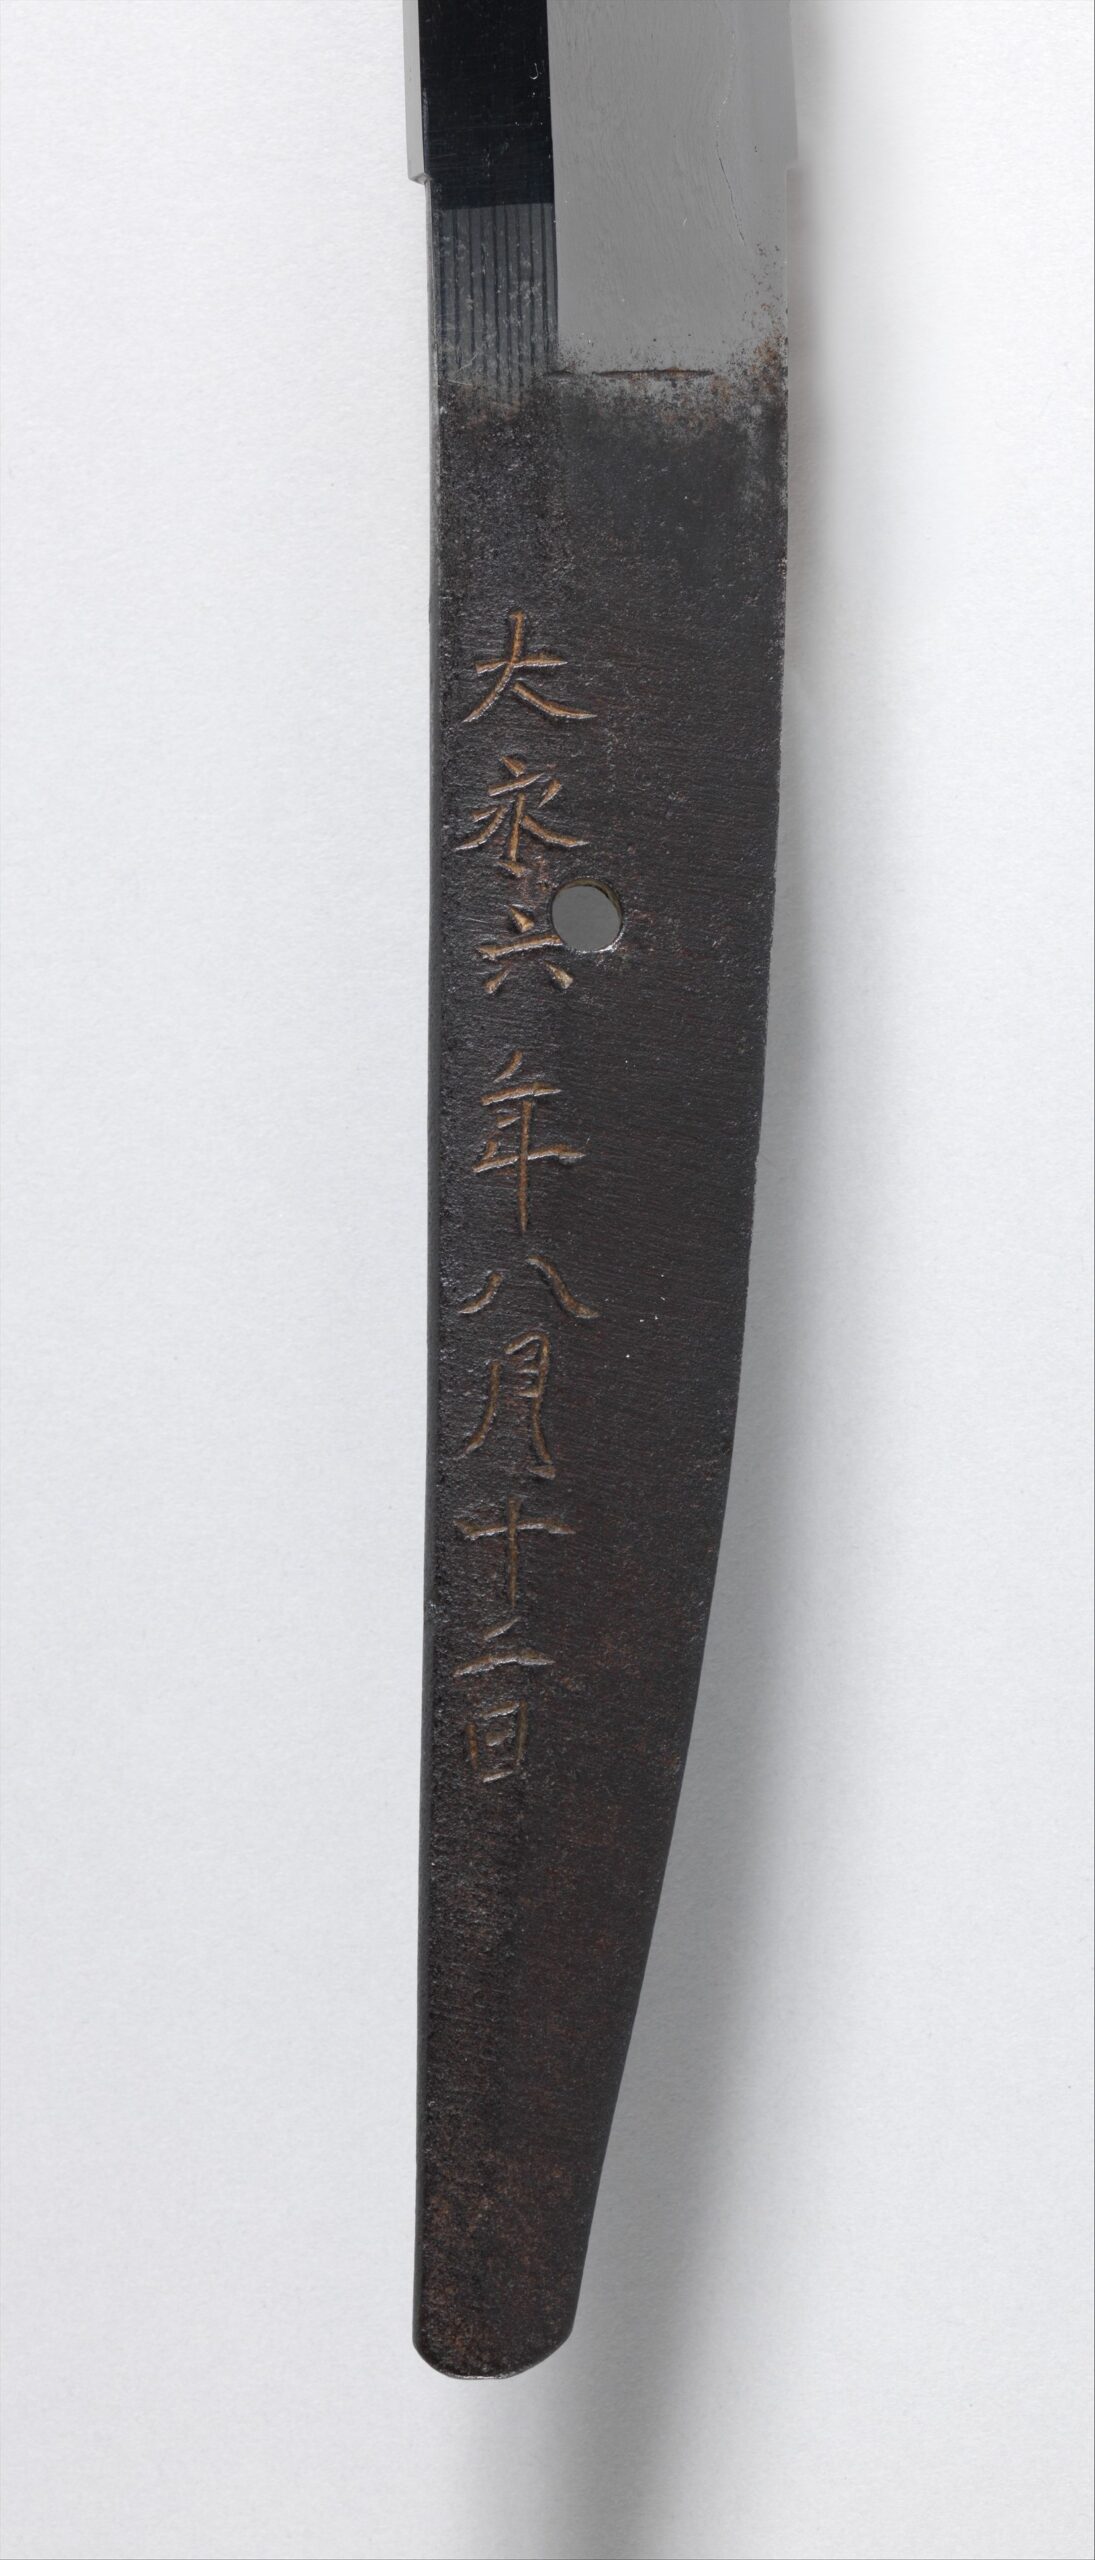
One face of the tang of Metropolitan Museum object 2001.574. The museum transcribes this face's inscription as FUJIWARA MASAZANE SAKU. Comparison with the photograph allows it to be rendered in standard characters as 藤原正真作; this is not the museum's own Japanese transcription. The photograph shows a vertical line of characters beside the peg hole. The Metropolitan Museum of Art 2001.574 / CC0 / Collection RecordThe opposite face of the same sword's tang. The museum transcribes the date as DAIEI ROKUNEN HACHIGATSU JŪNINICHI; comparison with the photograph allows the standard-character rendering 大永六年八月十二日. The visible arrangement is a vertical line of characters continuing near the peg hole. Daiei 6 corresponds to 1526, but the month and day follow the calendar then in use. The Metropolitan Museum of Art 2001.574 / CC0 / Collection Record
The Metropolitan Museum publishes object 2001.574 as by Masazane, dated 1526. Its romanized inscription descriptions, compared with the photographs, can be rendered in standard characters as 藤原正真作 on one face and 大永六年八月十二日 on the other (The Metropolitan Museum of Art). Both photographs show a vertical line of characters passing near the peg hole.
In this way, the arrangement itself, with the inscription that includes the maker's name on one side and the date inscription on the other, offers a clue for checking the division of a label into fields against an actual object. The date is recorded using the era name of the time; Daiei 6 corresponds to 1526, but the month and day, the 12th day of the 8th month, follow the calendar of the time and are not the same as the date in the modern calendar. Note that being able to read an inscription and judging who made the sword are separate matters. Authenticity cannot be determined from photographs or characters alone.
The order for checking at an exhibition
First, read the whole title of the work, and mentally separate what is inside the parentheses from what is outside
Look for terms such as 銘 (mei, inscription), 無銘 (mumei, unsigned), 伝 (den, traditionally attributed), and 金象嵌銘 (kinzōgan-mei, gold-inlaid inscription), and decide which field the information belongs to
If a date is given, copy it down as written in the era name (check the corresponding year later)
If the tang is visible in the display, compare the character string in the official description with the vertical arrangement in the photograph or on the actual object
Do not do anything to the sword yourself, such as removing the hilt or cleaning off rust
For characters you cannot read or questions about attribution, check the exhibition commentary on the spot or ask a curator
Toward Your Next Viewing
Once you can read a label field by field, the same gallery may feel a little more expansive. Next time, divide the label of one work into four notes: inscription status, maker attribution, date inscription and sword name. Anything you cannot categorize becomes a question to research next. For what specialists check in individual works, see Determining a Japanese Sword's Authenticity: The Appraiser's Role.
Gallery labels may show regional names such as Bizen and Sōshū, indicating where a sword is thought to have been made and the technical lineage to which it is attributed. Five regions are well known for kotō: Yamato, Yamashiro, Bizen, Sōshū and Mino, collectively called the Five Traditions (Hyōgo Prefectural Museum of History: Sword Production Regions). This term groups five major kotō traditions; it does not divide every Japanese sword into five exhaustive categories. Here they are starting points for pausing before an individual sword, rather than a chart to memorize. For chronology, also see Kotō, Shintō and Shinshintō: The Differences.
A Separate Matter from Schools of Swordsmanship
Tradition may suggest a school of swordsmanship, but here it means a lineage of blade-making techniques. Nagoya Touken World Museum also explains the Five Traditions as regional sword-production techniques that developed independently (Nagoya Touken World Museum). Distinguishing makers' lineages from users' martial schools makes regional names on labels easier to read.
Where Did the Gokaden Develop?
What appears on labels are the names of the old provinces. Because the extent of the old provinces does not coincide exactly with present-day prefectural borders, please use the table below as a rough guide to “approximately where” each one was.
The Five Traditions are not five unrelated boxes. Sōshū developed around Kamakura with the migration of smiths from Yamashiro and Bizen. Mino was also shaped by smiths arriving from different regions. In the shintō period, production spread to Edo, Osaka, Kyoto and castle towns elsewhere (Hyōgo Prefectural Museum of History).
Later examples also suggest movement between traditions. The Metropolitan Museum describes a daishō pair made by Taikei Naotane in 1839: although by the same maker, the katana is in Bizen style and the wakizashi in Sōshū style (The Metropolitan Museum of Art). This illustrates later smiths studying different traditions. A region's name is a clue to maker and style, not a guarantee that every sword associated with it looks the same.
Looking Closely at a Single Blade
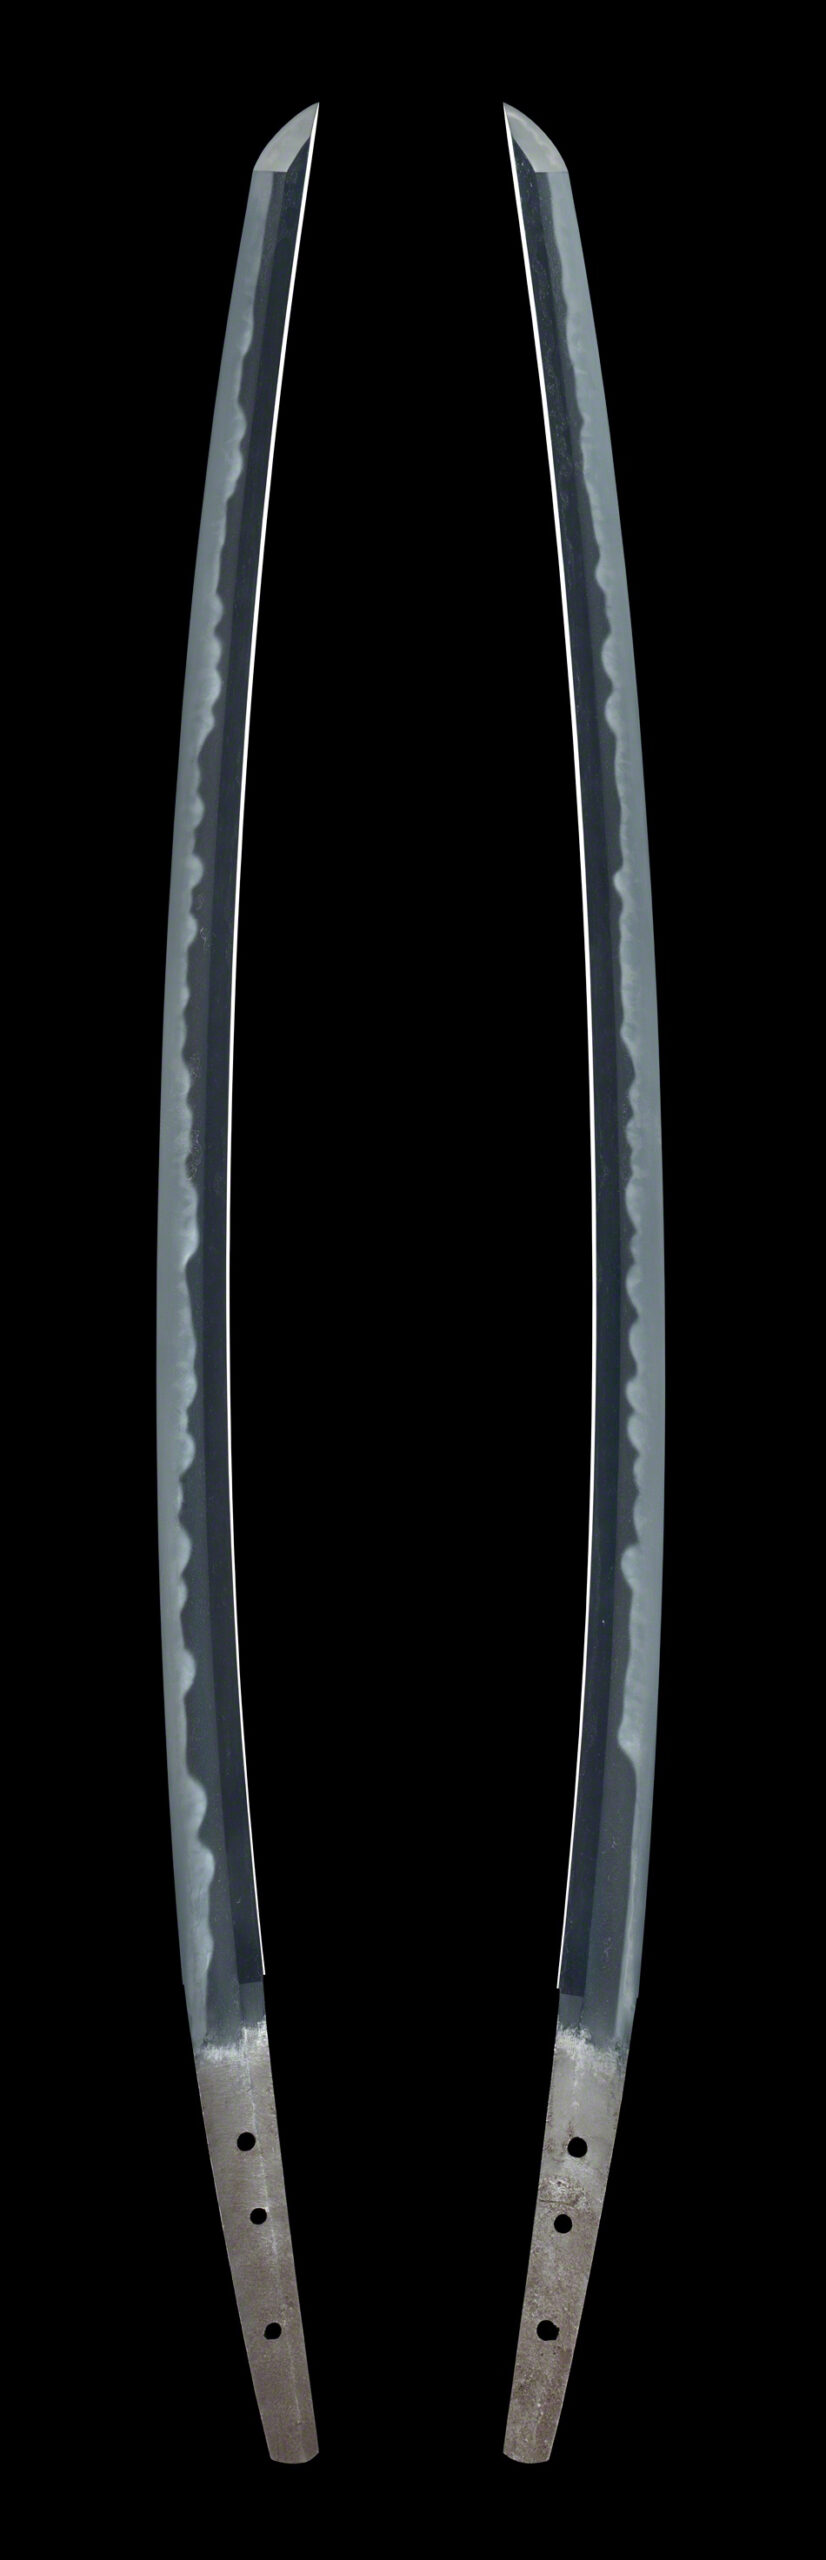
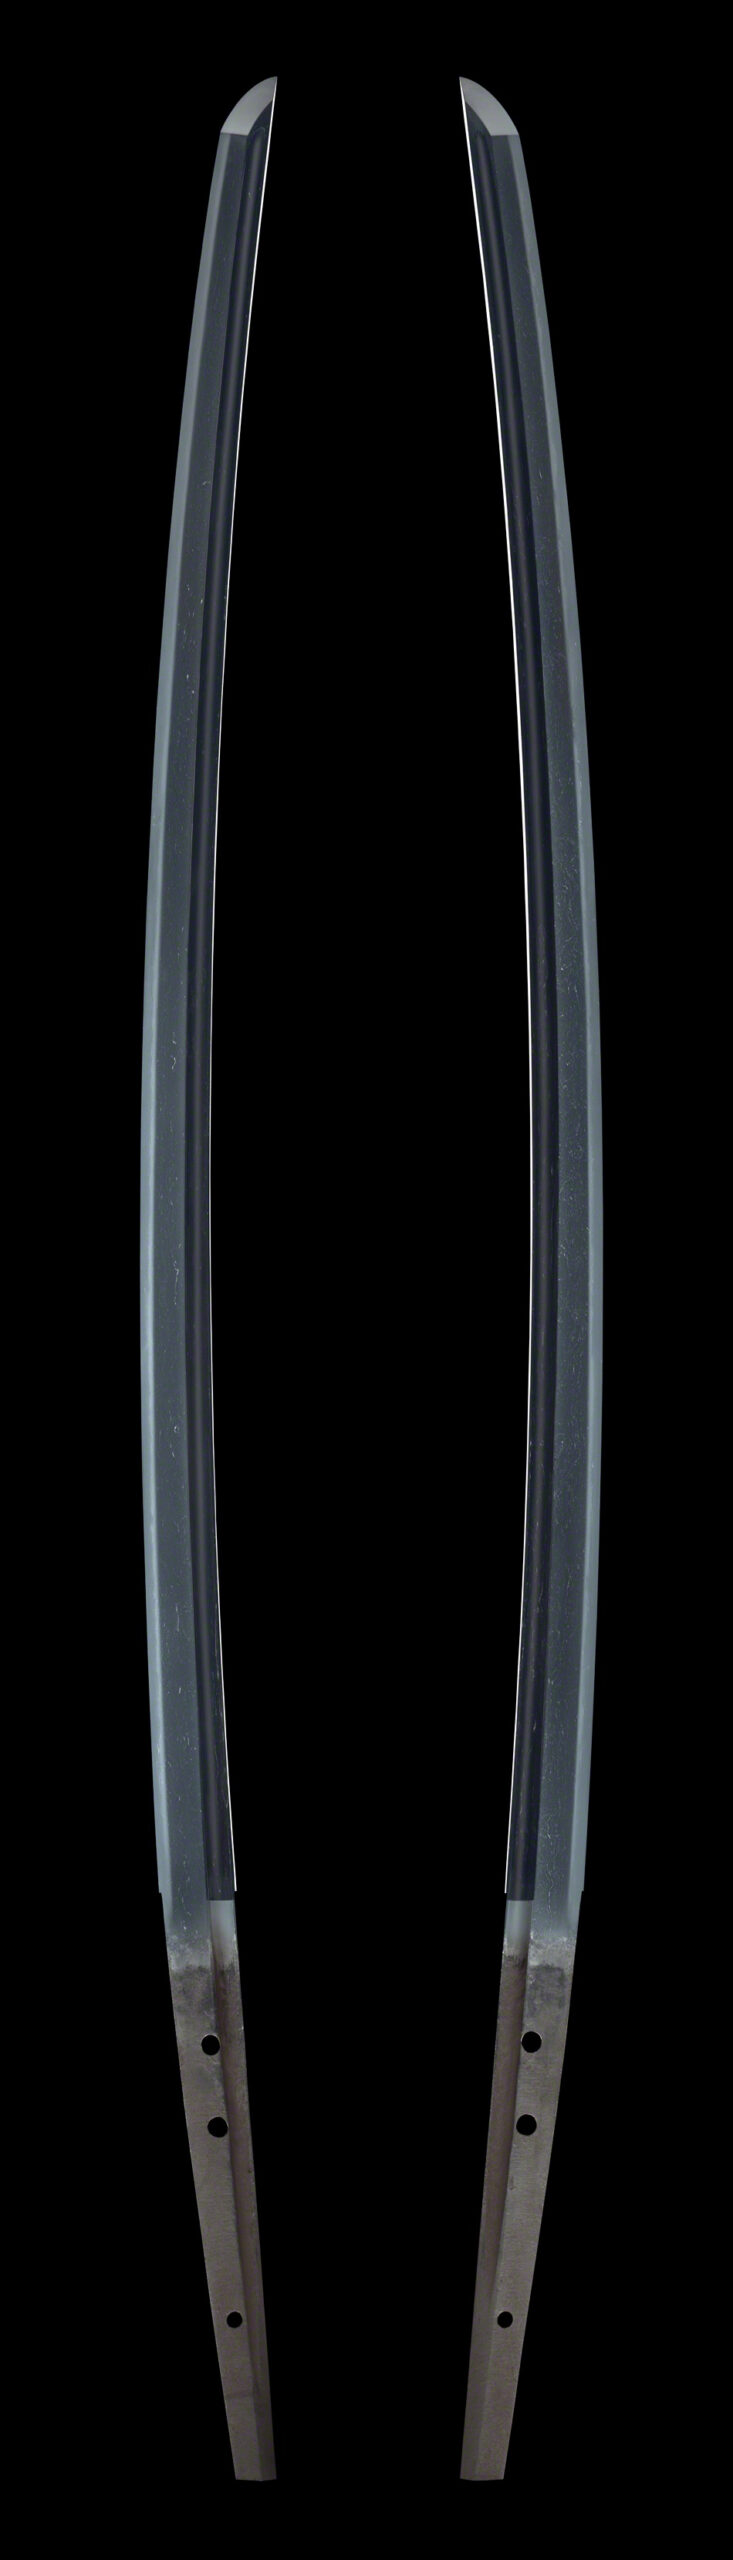
Fukuoka Ichimonji tachi signed Ichi. Tokyo Fuji Art Museum identifies it as an Important Cultural Property, Kamakura period, 13th century, blade length 72.0 cm, with a broad blade and a temper pattern of jūka-chōji mixed with kawazuko-chōji. The photographs show both faces of the same sword: a pale band waves along the blade and three peg holes appear in the tang. The band indicates the approximate hamon location, not its exact boundary. Images are not to a common scale and cannot be used to compare dimensions. Tokyo Fuji Art Museum, Object 01614 / CC0 / Collection Record
Tokyo Fuji Art Museum officially describes its Fukuoka Ichimonji tachi as an Important Cultural Property of the Kamakura period, 13th century, with blade length 72.0 cm, a broad blade and jūka-chōji mixed with kawazuko-chōji (Tokyo Fuji Art Museum). The photographs show both faces of the same sword, with a pale band waving along the curved blade and three peg holes visible in the tang. The band marks the approximate temper-pattern area, not its precise boundary. Leaving the specialist terminology to the commentary, first follow where the peaks grow larger and smaller, from the tang end toward the point. The name Bizen may become associated in memory with this flowing pattern.
Checkpoints to Confirm at an Exhibition
Read the province name or production-region name on the label first, and check in the correspondence table roughly where that is today
Follow the continuous line of the hamon with your eyes, in order from the side near the nakago toward the kissaki
Shift your standing position slightly and check whether the appearance of the jigane and hamon changes (follow the museum's guidance)
Compare two or more works by different makers that carry the same province name, and notice the differences
Do not remove the hilt or scabbard yourself. Read the nakago and the inscription only within the range shown in the display or its explanation
Do not try to identify a lineage from visual impression alone; limit yourself to putting into words “where they are alike and where they differ”
Toward Your Next Viewing
The Five Traditions provide regional landmarks for finding your own route through a large gallery, rather than a scale for scoring works. On your next visit, note the province of one work that interests you, then look for another from that province at a different museum. With each comparison, the regional name becomes a memory as well as a category. For a viewing sequence, also see Enjoying Japanese Swords.
Two terms that come up often in explanations of Japanese swords are hamon (刃文) and jigane (地鉄). Both refer to features that appear on the surface of the blade, but they are seen in different places. If the two remain confused, you can read an explanatory text and still end up not knowing which part of the actual object it refers to. Here, using just two photographs of publicly available collection pieces, we follow this order: first grasp the difference in hamon by eye, and then shift your gaze to jigane, a separate layer. The photographs shown are of museum collection pieces, not items handled by our company. Because the photographic conditions differ, size on screen is not a comparison of actual dimensions. We should also note in advance that the light and dark seen in the photographs include the effects of the method of polishing and of lighting and exposure. In the text, we separate what the museum's commentary states from what can be said from the photographs.
Hamon and Jigane Are Seen in Different Places
The hamon is the pattern formed by quenching at the boundary between the hardened edge and the blade's body. Viewed from the front, its shape follows that boundary along the cutting-edge side. Jigane, by contrast, is the appearance left by forging in the broader surface toward the spine. Terms include itame-hada, masame-hada, mokume-hada and ayasugi-hada (Japanese Sword Museum: The Appeal of Japanese Swords).
As a way of remembering it, the reliable approach is to divide them by position: what appears along the edge is the hamon, and what spreads across the surface of the ji is the jigane. If you rely on light and dark tones alone, you may mistake polishing marks or reflections of the lighting for the hamon.
A Blade Based on Suguha
The first image shows Tokyo Fuji Art Museum's unsigned katana attributed to Taima. It is dated to the late Kamakura period, 14th century, with blade length 70.9 cm. The commentary describes tightly forged itame texture and suguha mixed with ko-midare. It is also introduced as a tachi later shortened into a katana (Tokyo Fuji Art Museum, Object 01606).
Unsigned katana attributed to Taima. The official commentary dates it to the late Kamakura period, 14th century, with blade length 70.9 cm, tightly forged itame and suguha mixed with ko-midare, and describes it as a shortened tachi. The photograph shows two faces of the same sword, with a pale band running almost straight along the blade. The edge of that band is not necessarily the hardened-edge boundary, and fine steel texture cannot be identified from this image. Tokyo Fuji Art Museum, Object 01606 / CC0 / Collection Record
The photograph shows both faces of the same sword, not two swords. The pale band along the edge appears almost straight. This corresponds to the impression of suguha, but the band's edge cannot simply be equated with the hardened-edge boundary. Suguha need not be ruler-straight: small irregularities may appear within its generally straight form (Kyoto National Museum: Japanese Sword Viewing Points). The museum's description of mixed ko-midare refers to these small fluctuations, which the photograph's resolution and lighting make difficult to discern.
A Blade with Spreading Choji
The second image shows Tokyo Fuji Art Museum's Important Cultural Property tachi signed Ichi, by the Fukuoka Ichimonji school. It is dated to the middle Kamakura period, 13th century, blade length 72.0 cm. The commentary describes jūka-chōji mixed with kawazuko-chōji (Tokyo Fuji Art Museum, Object 01614). These specialist names follow that museum's wording.
Important Cultural Property: tachi signed Ichi. The official commentary identifies it as Fukuoka Ichimonji, middle Kamakura period, 13th century, blade length 72.0 cm, with jūka-chōji mixed with kawazuko-chōji. The photograph shows both faces of the same sword and the continuously undulating edge of a pale band. Polishing and lighting affect this appearance, so the pale area cannot simply be taken as the hardened-edge boundary. Tokyo Fuji Art Museum, Object 01614 / CC0 / Collection Record
This photograph also places the two faces of one sword side by side. Compared with the previous example, the pale band's edge rises and falls in successive peaks. In contrast to the straight impression of suguha, this belongs to the broad midareba group, of which chōji is a representative type (Kyoto National Museum: Japanese Sword Viewing Points).
Just by looking back and forth between the two images, you can grasp the first distinction: “Is the line along the edge straight, or does it undulate?” The finer names beyond this can be picked up little by little after you have seen actual swords several times. To repeat, the area that looks white in a photograph also includes the effects of polishing and of how the light falls, and does not necessarily coincide with the boundary of the yakiba.
The Names of Jigane, and the Limits of What Photographs Can Show
However, these cannot be identified from the photographs shown in this article. The reason we can write “tight itame” about the blade attributed to Taima mentioned earlier is that the museum's commentary says so; we are not determining the pattern of the hada from how the photographs look. Jigane is fine, and it appears and disappears depending on the angle of the light. Even in the gallery, how it looks often changes when you shift your standing position slightly.
For the same reason, the difference between nie (沸) and nioi (匂), which express the fineness of the hamon—explained as a difference in how the particles look and in their size—is also an item better suited to observation in front of the actual object than to photographs.
The Variables of Lighting, Polishing, and Photographic Conditions
The look of a blade is not determined by the sword alone. The method of polishing, the lighting of the display case, and, in the case of photographs, the light source and exposure greatly affect how it appears. For that reason, it cannot be said that “because it does not show in the photograph, that feature does not exist.” Conversely, even if something shows clearly in a photograph, its outline cannot simply be asserted to be the boundary of the yakiba.
Trying to determine maker or authenticity from individual details such as pattern, inscription or dimensions goes beyond the appreciation stage. Questions about a work you own require a specialist's examination of the actual object (Determining a Japanese Sword's Authenticity: The Appraiser's Role).
Observation Checkpoints, and Notes on Your Impressions
Follow the band visible along the edge with your eyes, and first see whether it is straight or undulating.
If it undulates, see whether the shapes of the peaks are uniform or whether large and small ones are mixed.
Move your gaze toward the mune side, and look for whether a flowing or swirl-like look is visible on the surface of the ji.
When it is hard to see, change your standing position slightly and try different angles of light.
Finally, read the commentary on the label, and compare how it looked to you with the museum's words.
At this point, we also recommend not trying to rephrase things in technical terms, but jotting down brief notes in your own words, such as “a quiet, thin line” or “undulating in a lively way.” Once you have accumulated notes on several pieces, you will begin to see what kind of look you are drawn to.
A Guide to Your Next Viewing
Distinguishing hamon and jigane is not learned in a single visit. For a gallery viewing sequence, see Enjoying Japanese Swords. Once you have collected notes and want to describe your preferences, try Three Questions When Choosing a Japanese Sword. Next time you face a real sword, follow the line along its edge for one breath longer.
When you look at Japanese swords in a gallery, you notice that the object labels give different names: “tachi,” “katana,” “wakizashi,” and “tanto.” Most have single-edged blades, but their shapes are not uniform. Some examples have pronounced curvature, while others, like tanto, look almost straight. At first it is hard to tell what differs and how. This article sets out an order for calmly telling the four names apart using two clues: approximate length and how the sword is worn. The photographs shown are all of works in museum collections and are not items handled by our company. Please note at the outset that, because the shooting conditions differ, the scale is not uniform, and comparing sizes on screen does not amount to comparing the actual lengths.
The name is not decided by length alone
First, remember that the distinction between tachi and katana (uchigatana) is not simply length. A tachi is suspended from the waist with its edge downward; a katana is inserted into the sash with its edge upward. The different orientation and method of wearing result in differences in the fittings on their mountings (Hyōgo Prefectural Museum of History: Tachi and Katana; Japanese Sword Museum: Types and Construction).
Wakizashi and tanto, on the other hand, are divided mainly by length in the current classification. However, sources vary in how they express the boundaries, and the handling of “or more” and “or less” sometimes overlaps. The figures of 1 shaku and 2 shaku are guides for classification, not strict dividing lines. For individual works, the surest approach is to give priority to the official name given by the holding museum.
Comparing the four names side by side
The table below is a simple list to keep in the back of your mind when viewing. The length figures are approximations in the traditional shakkanho system of measurement: 1 shaku is about 30.3 cm, and 2 shaku is about 60.6 cm.
Type
Approximate length
How it is worn
Points to check alongside on the label
Tachi
No fixed range; cannot be distinguished from a katana by length alone
Suspended from the waist with the edge down
Date of production, whether it has been shortened (suriage), position of the signature (mei)
Katana (uchigatana)
Many explanations give roughly 2 shaku (about 60.6 cm) or more as a guide
Thrust through the sash with the edge up
Any note that it may originally have been a tachi
Wakizashi
Many explanations give 1 shaku or more but less than 2 shaku (about 30.3–60.6 cm) as a guide
Thrust through the sash alongside the katana
Pairing with a katana, whether there is a koshirae
Tanto
Many explanations give less than 1 shaku (about 30.3 cm) as a guide
A short blade thrust through the sash
Carvings, design of the koshirae
The table gives representative guides only. There are quite a few exceptions near the boundaries, such as the kodachi, a shorter tachi, and the sunnobi tanto, a somewhat longer tanto. Note too that the divisions of about 30 cm and about 60 cm are merely approximations that restate 1 shaku and 2 shaku in an easy-to-grasp way. When the name on an object label seems not to match the guide figures, take the museum's name as the standard.
Blade length and overall length are different figures
A common difficulty in comparing lengths is knowing the measurement's endpoints. In Japan, blade length is described as the straight-line distance between the point and the machi, or notch (Gifu Prefecture: Sword Terminology). The nakago, or tang inside the hilt, is excluded.
Overseas museums may list measurements using several standards. For example, the Metropolitan Museum's tachi page records an overall length including the mounting of 104.2 cm and a cutting-edge length of 72.1 cm (The Met 36.25.1695a, b). The latter corresponds to what is termed blade length in Japan. Comparisons in this article use the museums' cutting-edge or blade-length figures consistently. Mixing different measurement standards can make the same sword appear to be a different object.
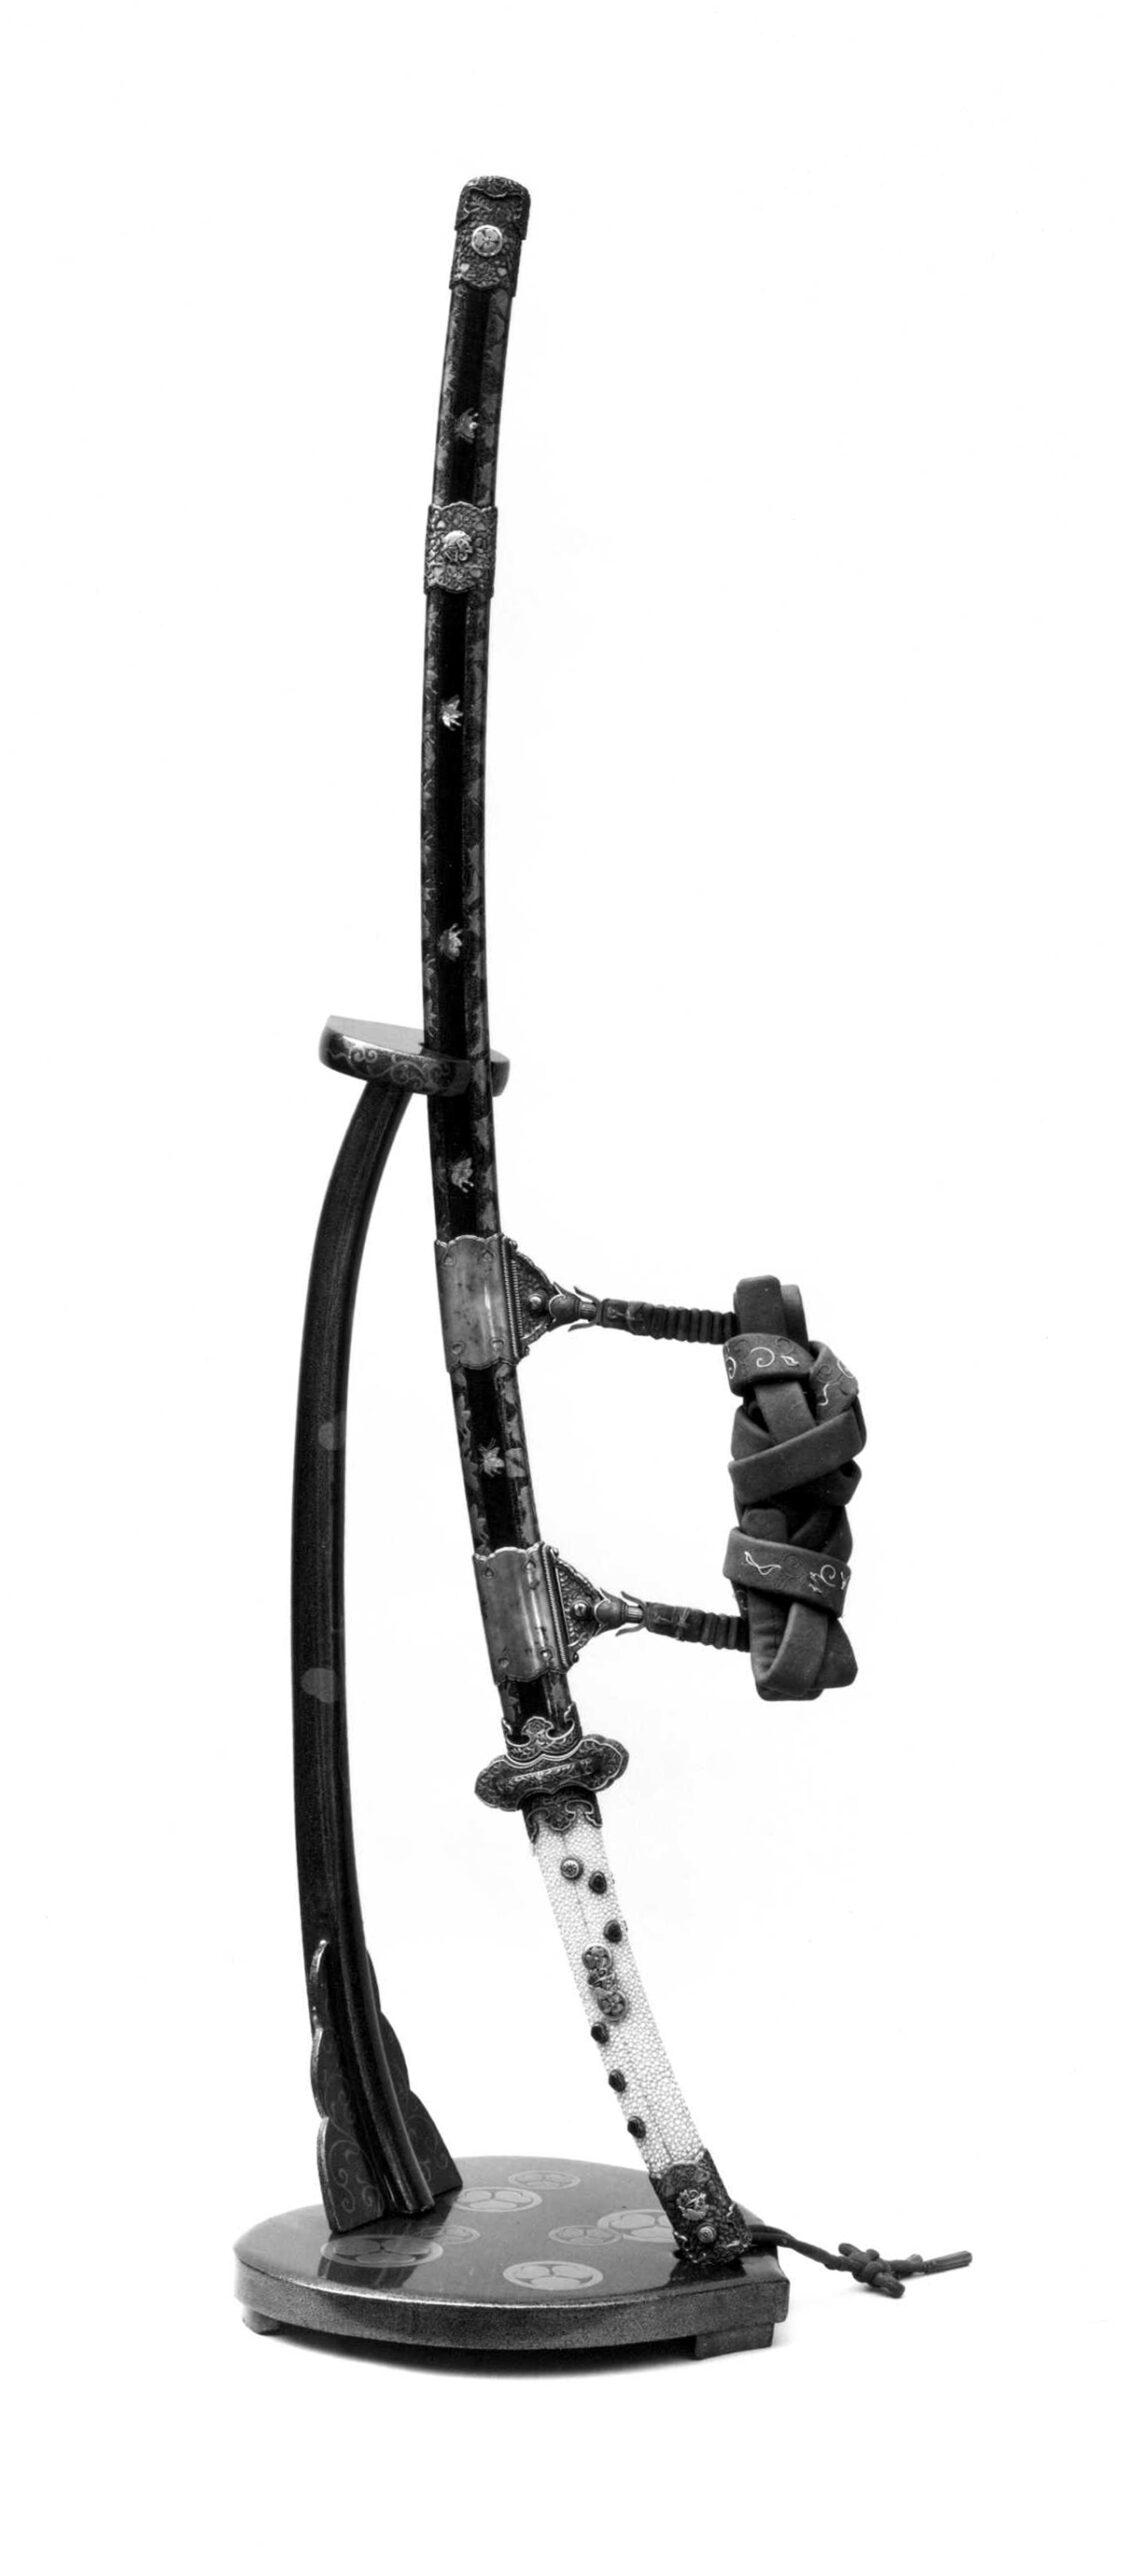
A tachi mounting photographed on a sword stand. The fittings and cords on the scabbard are used to suspend it from the waist. The blade is sheathed and not visible. The official record gives an overall length of 104.2 cm and cutting-edge length of 72.1 cm. Images are not shown to a common scale, so on-screen sizes cannot be used to compare lengths with other works. The Metropolitan Museum of Art, 36.25.1695a, b / CC0 / Collection Record
This photograph shows a tachi koshirae; the blade is not shown because it is housed in the saya. The metal fittings and cords attached to the saya are the mechanism for suspending it from the waist. Length cannot be measured from a photograph, so always check dimensions against the entry on the work's page.
A katana (uchigatana) blade and mounting shown together, including scabbard, hilt and guard. The official record gives a cutting-edge length of 70.2 cm. The darkened section at the base is the tang, normally enclosed by the hilt. Images are not shown to a common scale. The Metropolitan Museum of Art, X.11 / CC0 / Collection Record
This katana (uchigatana) is photographed with its blade and mounting side by side. Its recorded cutting-edge length is 70.2 cm (The Met X.11), close to the tachi's 72.1 cm. This makes clear why length alone cannot distinguish the two.
For Tachi and Uchigatana, Also Look at How They Were Worn and Their History
When lengths are similar, the wearing method and history are useful clues. Tachi mountings have suspension fittings, while uchigatana mountings are made for insertion into a sash. Some blades originally made as tachi were later shortened and reshaped through suriage and came to be used as katana (Japanese Sword Museum: Types and Construction).
Signature position is also considered a clue, but known exceptions mean it cannot be conclusive by itself. The basic approach is to compare several kinds of information, including form, inscription, date and provenance (Hyōgo Prefectural Museum of History: Tachi and Katana). At the appreciation stage, do not infer authenticity or value from a single factor such as an inscription or measurement.
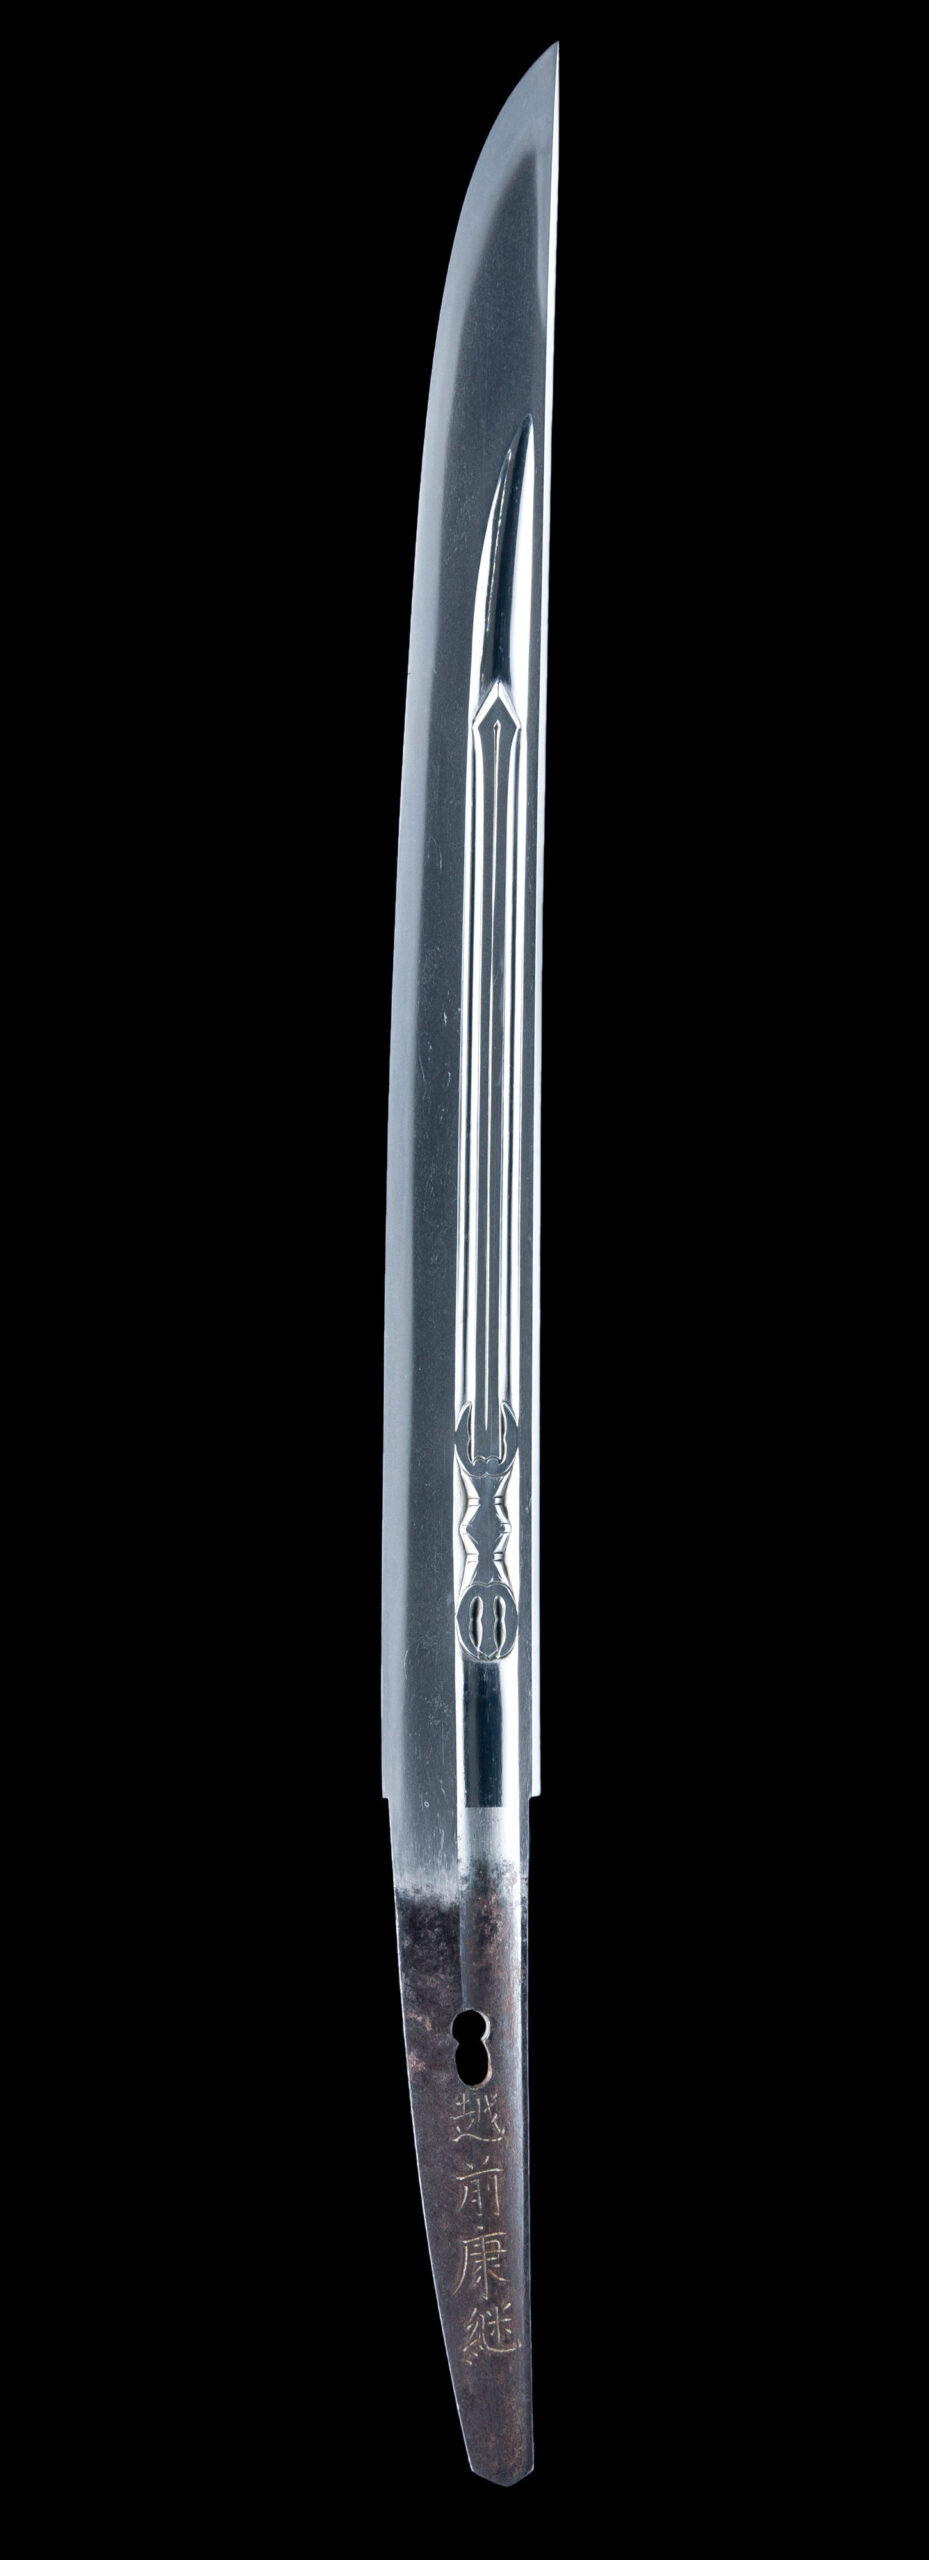
A wakizashi blade. Its official cutting-edge length of 37.1 cm falls within the modern guideline range of at least one shaku and less than two shaku. An inscription on the tang is visible in the photograph. Images are not shown to a common scale. The Metropolitan Museum of Art, 29.100.1370a–c / CC0 / Collection Record
This is a wakizashi blade. Its cutting-edge length is recorded as 37.1 cm, within the guideline range of at least one shaku and less than two shaku (The Met 29.100.1370a–c).
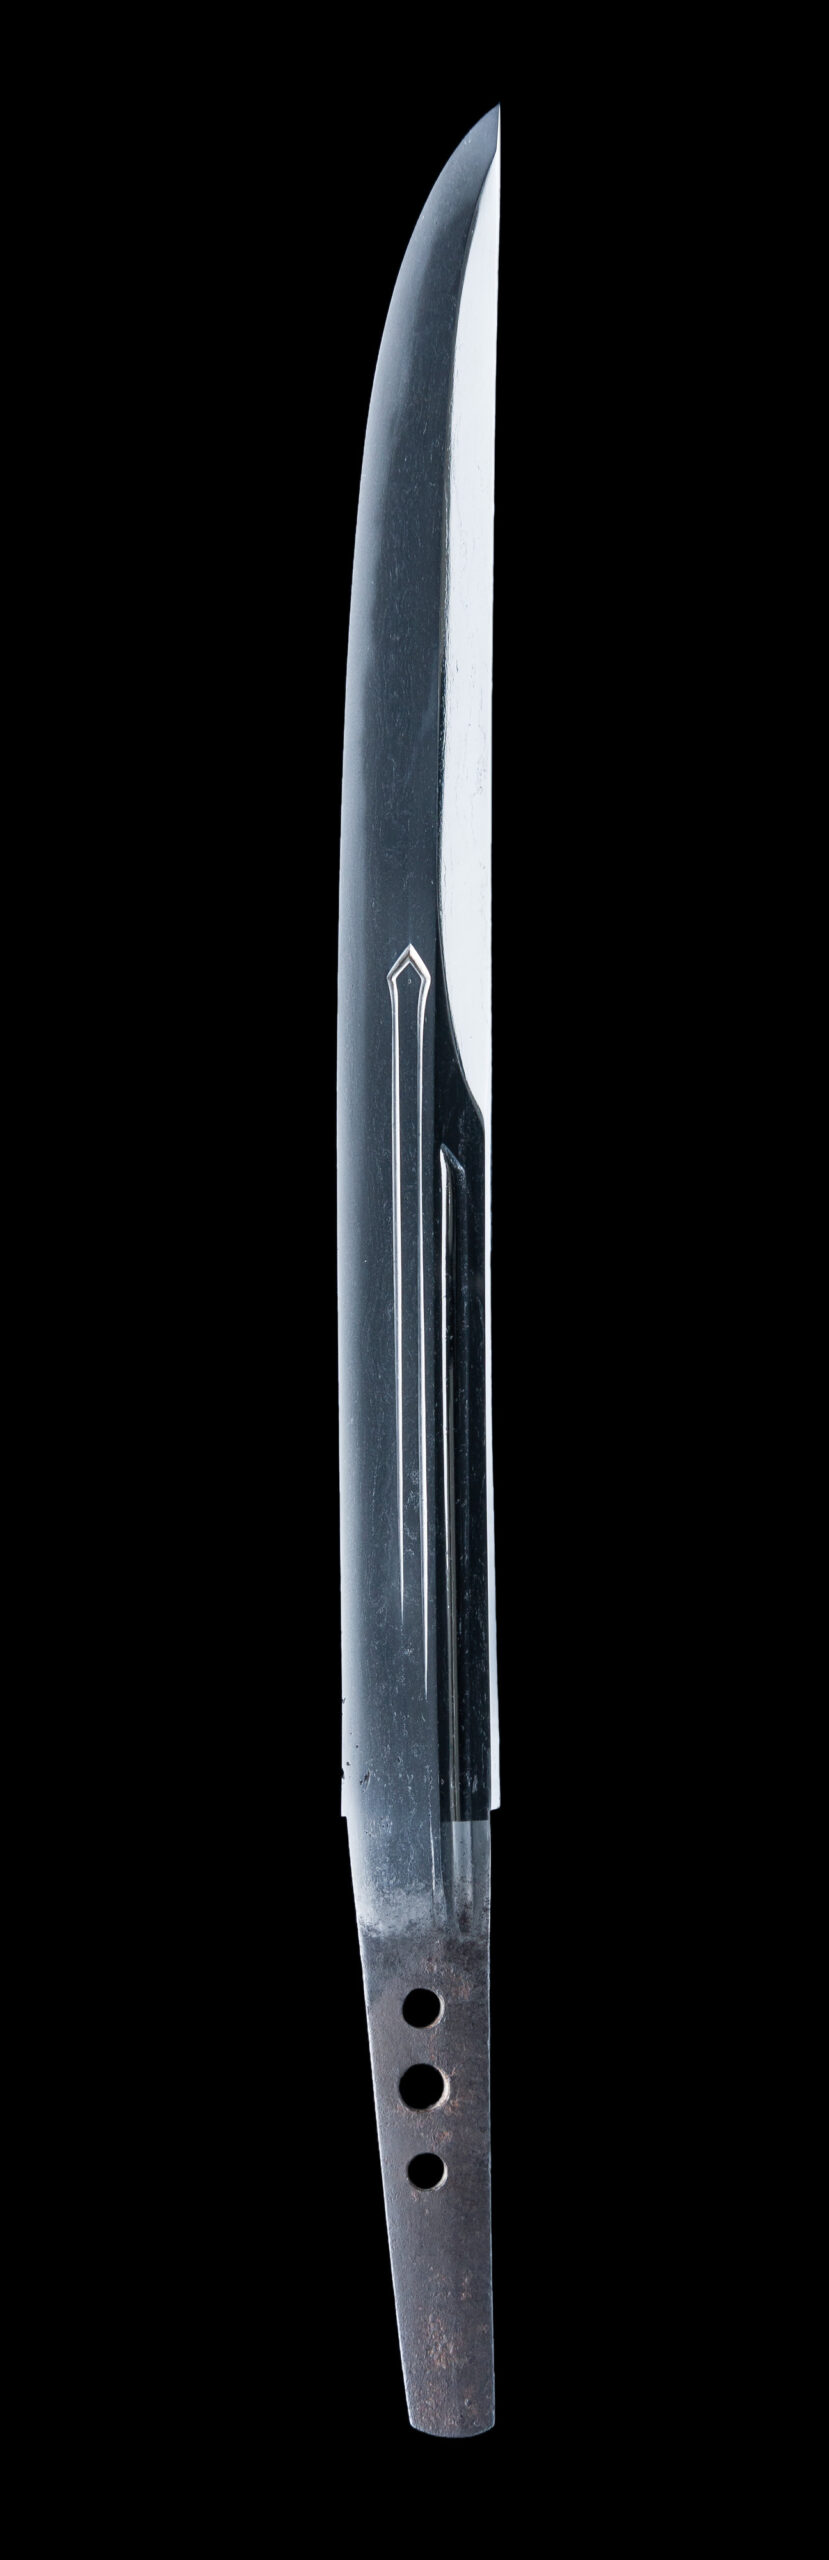
A tantō blade. Its official cutting-edge length of 27.9 cm falls within the modern guideline of less than one shaku. Three holes are visible in the tang. Their origin and the history of alterations cannot be determined from this photograph. Images are not shown to a common scale. The Metropolitan Museum of Art, 29.100.1362a–c / CC0 / Collection Record
The tantō has a cutting-edge length of 27.9 cm, within the guideline of less than one shaku (The Met 29.100.1362a–c). Comparing the four examples shows that differences in the museums' recorded blade lengths broadly correspond to differences in terminology.
Observation Checkpoints in the Exhibition Room
First, read the formal title on the work's label and confirm whether it is a tachi, katana, wakizashi, or tanto.
Next, look for the stated length and check whether it is the blade length or the overall length.
If a koshirae is displayed together with the blade, observe whether it has fittings for suspension or a form meant to be thrust through the sash.
Read the explanatory text for any mention of suriage or provenance, and consider whether the present form is the original one.
Finally, jot down your own impressions in short phrases such as “shorter than I expected” or “shallow curvature.”
Loosely settling on an order like this reduces oversights and makes it easier to retrace your memory later. Note that touching the blade or disassembling a sword yourself is outside the scope of appreciation. Simply following it slowly with your eyes from outside the display case is more than enough to enjoy it.
A Guide to Your Next Viewing
Once you can distinguish names and dimensions, add the question of when a sword was made. Even among objects called katana, characteristic forms change by period. Period divisions are summarized in Kotō, Shintō and Shinshintō: The Differences. For an overall sequence of moving through a gallery and choosing where to look first, see Enjoying Japanese Swords. Bringing together name, length and date gradually reveals more in the brief wording of a label.
When you keep a Japanese sword at home for the first time, the first things you are unsure about are where to put it and where to draw the line on how far you may handle it yourself. Working on it in an attempt to improve it may end up damaging the blade or the mountings.
This article does not go into procedures such as drawing the blade, polishing, disassembly, or treating rust. Instead, it sorts out where to keep the sword in the home, what can be checked from the outside while the sword remains in its scabbard, and the signs that you should seek advice rather than touch it yourself. Because the condition of an individual sword cannot be judged without seeing the actual piece, please check any points you are unsure about with the seller or a specialist.
Check what you have on hand before storing
The first thing to look at is not the blade but what accompanies it. For the Firearms and Swords Registration Certificate, first establish whether you have it and where it is kept, and sort out which sword the document belongs to. There is no need to draw the blade or disassemble the mountings in order to check. Comparing the sword against the entries on the document should be done with the seller or a specialist in a safe setting.
Next examine the exterior: is the blade in a shirasaya or a koshirae mounting? The craftsmanship of mountings is discussed in Mountings and Sword Fittings.
Also check whether a bag is included. The Japanese Sword Museum advises keeping both shirasaya and koshirae in bags (Japanese Sword Museum: Handling and Preservation). If a bag is torn or damp, or its cord is broken, explain the condition to the seller or a specialist rather than replacing or repairing it on your own initiative.
Where to keep the sword, and what you can check yourself
What to avoid in a storage location is humidity. For preserving the blade, the Japanese Sword Museum lists avoiding humidity and laying the sword horizontally, because oil collects at the bottom if the sword is stood upright. It also says that camphor and naphthalene should be avoided because they cause rust. On the other hand, koshirae differ from the blade in that excessive dryness is also considered undesirable, and because a sword stored for a long period in old koshirae is prone to rust, the approach of using a shirasaya as a resting scabbard (yasume-saya) is presented.
What a beginner checks personally is limited to the areas visible from the outside while the sword remains in its scabbard. For inspection and care of the blade, please consult the seller or a specialist according to the sword's condition. Avoid testing strength or fit by touch, and avoid drawing the blade or disassembling the sword in order to take photographs.
Where to look
What can be checked from the outside
What to do when you notice something
Storage location
Whether there is dampness or condensation, and whether the sword is laid horizontally
Reconsider any location with dampness or condensation. Do not place camphor or naphthalene there
Exterior of the bag
Tears, soiling, dampness
Do not go ahead with replacement or repair yourself; describe the condition and consult
Outside of the scabbard
Cracks, stains, soiling
Do not test strength or fit by touch; note the condition and consult
Documents
Whether there is a registration certificate, where it is kept, and which sword the document belongs to
If you cannot find it, consult the relevant office
Care conditions such as the amount of oil and the frequency of care vary with the sword's condition, so do not rely on uniform figures; please consult the seller or a specialist in charge. Nor does being housed in a shirasaya mean that no care is needed.
Signs that you should consult rather than treat it yourself
The following conditions are occasions to consult before moving on to any work. There is no need to draw the blade to check for rust or fit.
Rust is already visible on the blade. The Japanese Sword Museum states that rust should not be scraped off by self-taught methods and that a sword polisher (togishi) should be consulted.
The sword feels hard to draw from the scabbard, or the fit feels loose. Please consult without testing it repeatedly.
The tsuka (hilt) or tsuba (guard) feels loose. Do not retighten or disassemble it.
The scabbard has cracks or stains.
The place where it was stored was damp, or it was left in place for a long time.
Even before having the actual piece examined, writing down the following points lets you proceed with the discussion after sorting out what accompanies the sword and its storage conditions.
Shirasaya or koshirae, and whether there is a bag
Where it was kept, and whether it was laid horizontally or stood upright
Whether insect repellent was used
Changes you noticed, and when you noticed them
Whether there is a registration certificate, and where it is kept
What you have done yourself so far, and what you have not
The Japanese Sword Museum, “Handling and Preservation Methods” https://www.touken.or.jp/museum/sword/preservation.html
The Japanese Sword Museum, “Frequently Asked Questions” https://www.touken.or.jp/museum/faq/
When looking at Japanese swords, you may come across works whose blades are carved with a dragon-like figure or with shapes that suggest written characters. Some people may find their eye drawn to these clearly defined designs, which are different from the hamon.
Carving applied to the blade is called toshin chokoku (blade carving) or horimono. The Nagoya Japanese Sword Museum's explanation introduces the history of hi, which are long, narrow grooves, and of carvings that incorporate religious designs.
Before memorizing difficult names, start by simply looking at the shapes. Here we suggest a viewing order that is easy to try even through a display case.
1. Before the design, look at the whole blade
First, step back a little and see where the horimono is placed within the blade as a whole.
Is it gathered toward the hilt end, or does it extend along the length of the blade? When you look at the carved areas together with the areas where nothing is carved, you may receive an impression different from that of a photograph that enlarges only the design.
In addition to “what is carved,” consider “how the whole appears with the carving in this position.” Thinking about the two separately is the first clue.
2. Look at the lines and the blank space left around them
Next, try following the lines with your eyes: lines that extend at length, lines that continue as they curve, and areas of fine overlapping. If you also turn your eyes to the steel surface left around the carving, the outline of the design becomes easier to grasp.
For example, with a work depicting a dragon, try seeing how far you can follow the form from the head to the body and on to the tail. It does not matter if you cannot make out the whole from the start.
The lines and shading you can see change with the lighting and where you stand. Follow the museum's rules and try changing your position to the extent that it does not disturb other visitors' viewing. Even if some parts are hard to see, view the work without touching the display case or the work itself.
3. Read the explanation, then go back once more
If you read the explanation of the work after looking at the shapes, you can connect names that are hard to remember from text alone with the shapes in front of you.
The official information for the Nagoya Japanese Sword Museum's special exhibition “Splendid Blade Carvings” introduces a work carved with a kurikara-ryu (Kurikara dragon). In this way, comparing the shapes you saw with the official names makes it easier to put your viewing into words.
There is no need to decide by imagination on meanings that are not in the explanation. When you do not know the subject or the maker, you can begin by asking, “What does this part represent?”
Do not decide value by the impression of the horimono alone
The period, maker, or price of a work cannot be judged solely from the fact that fine carving is visible or that the design is large. Photographs help you look again at details, but they do not show the work under the same conditions as the actual piece.
When considering a purchase, tell us what you liked and then try asking questions such as the following.
What can be learned about this horimono from documents and appraisal/certification papers?
Regarding the maker and the time of production, which points have been confirmed and which are unknown?
With the actual piece, from what position or angle can its features be seen?
More than being able to name the design, being able to say “I like this part” or “I want to know more about this part” becomes a clue in choosing a work.
When consulting Myōō about a purchase, please let us know, along with your other wishes, whether you would like a horimono and any designs that caught your interest.
Information checked: November 4, 2026. The three-step viewing order and the sample questions are suggestions from Myōō and are not a method for determining authenticity, maker, or price.
You stand before a sword, unsure where to look, and move on to the next case. Choosing a few starting points can change how you see the same exhibition.
Step Back to View the Overall Form
Begin a little way back from the case and look at the overall shape. Both the Society for Preservation of Japanese Art Swords and Tokyo National Museum identify sugata, or overall form, as a starting point for appreciation. Is the curve deep or shallow? Does the blade narrow toward the tip? How do its length and thickness feel? Remembering the outline before examining details makes comparison with the next sword easier.
Move Closer to Examine the Steel Surface
Next, move closer to examine the surface. Jigane refers here to the texture visible in the blade's steel, often described as resembling wood grain. It is visible only at certain angles, so shift your position slightly to change how the light falls. Lighting and display position may make it difficult to see. Be considerate of other visitors and find a comfortable view without leaning in excessively.
Follow the Temper Pattern
The pale pattern visible along the cutting-edge side is the hamon. The Society explains that it is formed by quenching. It can be nearly straight or rise and fall in large waves. Move your eyes slowly from the base toward the tip to notice changes in the spacing and size of the pattern. Begin by comparing straight and wavy patterns to see which catches your attention.
Viewing Position and Museum Rules
The direction of the lighting changes how the temper pattern and steel surface appear. Try moving your standing position slightly.
Avoid staying too long at one case and share viewing space with those behind you.
Photography permissions and permitted areas differ by museum. Check the guidance when entering.
If an object list or commentary is available, take a copy to review after returning home.
“Koto,” “Shinto,” and “Shinshinto” are terms you come across in explanations of Japanese swords. All of them are names that indicate the period in which a sword was made. “Shinto” (literally “new sword”) does not mean a brand-new sword made recently.
At first, you can grasp the flow by remembering that Koto are swords of the older periods, Shinto are swords from around the Keicho era onward, and Shinshinto are swords centered on the late Edo period. The order of the names is not a ranking of quality.
First, get a rough grasp of the three periods
Name
Approximate period
What to remember first
Koto (古刀)
Around the mid-Heian period to the end of the Muromachi period
Covers a long span of time; the shape differs by period and region
Shinto (新刀)
Around the Keicho era to the mid-Edo period
Does not refer to all “swords made in the Edo period”
Shinshinto (新々刀)
Centered on the late Edo period, up to the early Meiji period
The movement to study anew the styles of older periods is also a highlight
This table is a rough guide for grasping the overall picture. There are also the classifications of Jokoto before these and Gendaito after them.
The boundaries between the periods are explained differently depending on the source. The Japanese Sword Museum explains Keicho as the boundary between Koto and Shinto, and places Shinshinto from the Bunka and Bunsei eras onward. The Nagoya Japanese Sword Museum, on the other hand, defines Shinshinto as running from An'ei 1 (1772) to the Haitorei (sword abolition edict) of Meiji 9 (1876). For individual works, read the date notations in exhibition and appraisal materials as well.
When looking at Koto, go just one step finer on the period
The single word “Koto” contains a long history. When viewing, rather than deciding that “it is Koto, so it has this kind of shape,” try also paying attention to the periods given in the explanation, such as Kamakura, Nanbokucho, and Muromachi.
Our suggestion is to compare two blades and note down one difference that you yourself can see. “This one feels wide all the way to the tip.” “The curvature of this one is striking.” There is no need to identify the maker or the date from the start.
Shinto is a term distinct from the everyday phrase “new sword”
The “new” (shin) in Shinto is not newness measured from our present day. It is a classification used within the history of swords.
Even if an exhibition label says “Edo period,” do not decide from that alone whether a sword is Shinto or Shinshinto; checking the more specific period or the year of production will deepen your understanding. This classification also serves as a clue when comparing works from the same Edo period.
Shinshinto can also be enjoyed from the perspective of learning from the famous swords of the past
In the Shinshinto period, Suishinshi Masahide and others advanced a revivalist movement of learning from Koto. Swords modeled on works of older periods can be appreciated from two perspectives: “when it was made” and “which period's shape and style it aimed for.”
A similar shape does not necessarily mean the same period
Even if a sword looks similar to works of an older period, it was not necessarily made in the same period. It is important not to judge by shape alone, but to read the title of the work, the maker, the date, and the explanation together.
Consider period classification and the evaluation of a sword separately
Koto, Shinto, and Shinshinto are, first of all, words for knowing when a sword was made. When considering a purchase, too, do not reach a conclusion from these names alone; check the condition of each individual blade, its accompanying documents, and the basis for their explanations.
Period classification and rankings in reference materials are separate pieces of information, and a ranking alone does not determine the authenticity or price of an individual sword.
Myoo's Swordsmith Ranking Database lets you explore smiths by period. When a name catches your attention, first check its period, then explore commentaries on the works.
“I'm interested in Koto.” “I'd like to see swords from the Edo period.” A purchase inquiry can begin with words as simple as these. Using a work or shape that caught your interest as a starting point, please tell us what you are looking for.