
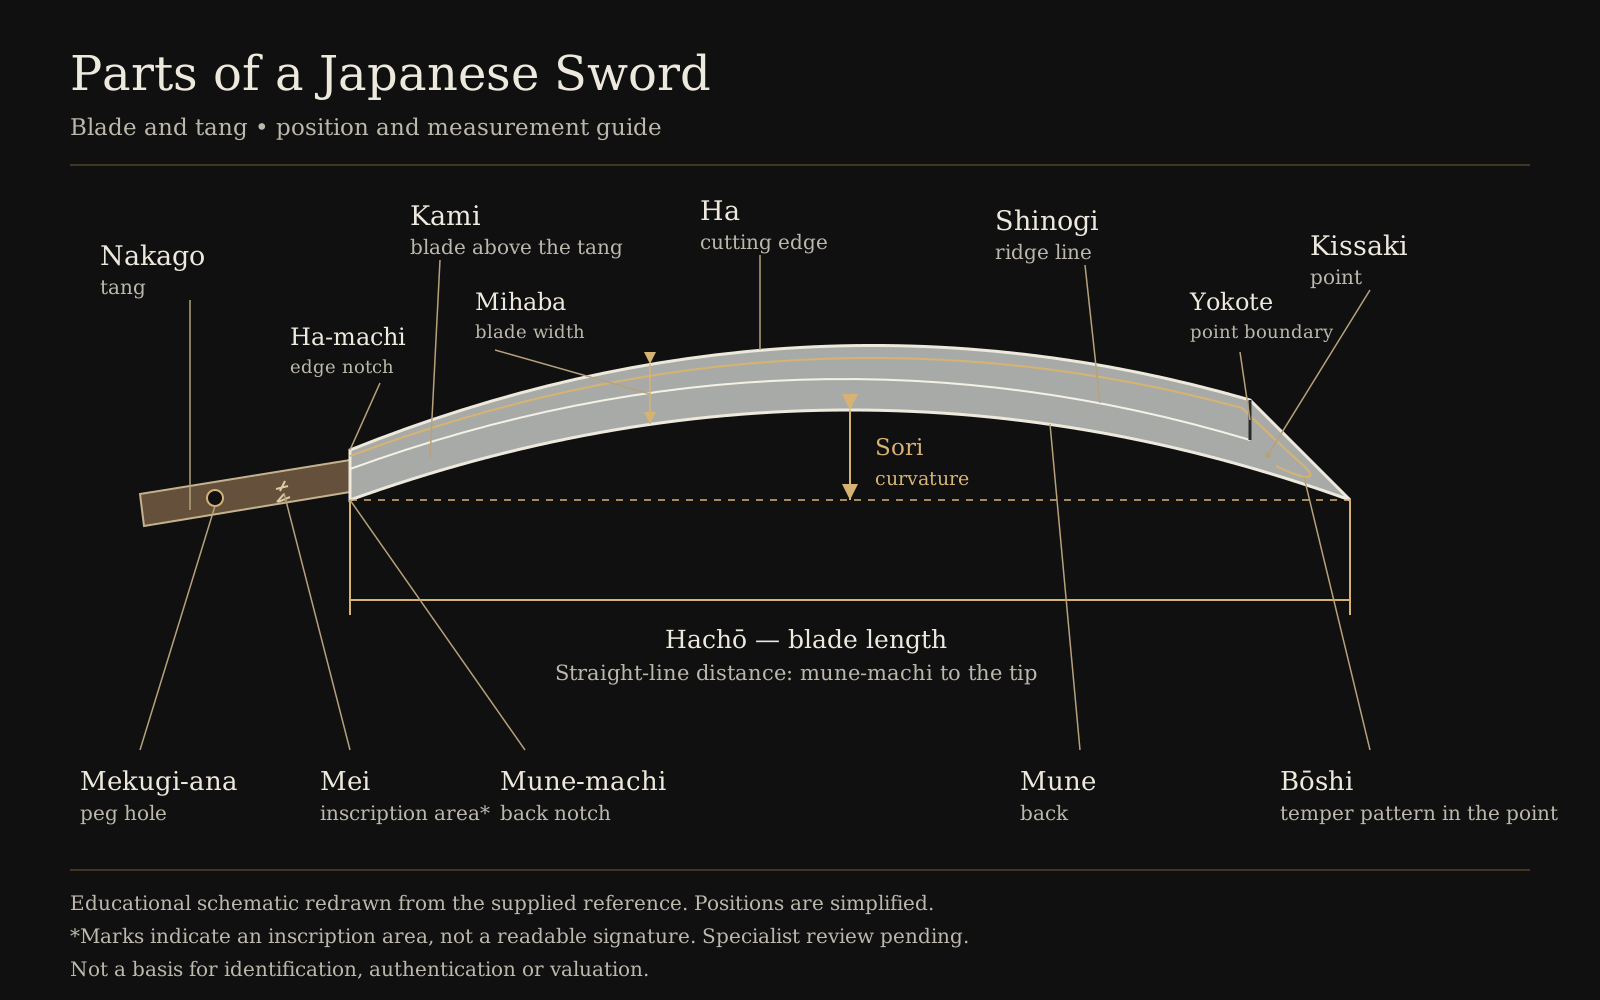
The names of the parts of a Japanese sword are less easily confused when learned together with position, that is, where each term points. First, separate the main body of the sword from its mountings (scabbard, hilt, tsuba, and so on). Next, trace the main body from the tip toward the hand. Here, as basic terms for the main body, we organize four terms in order of position: kissaki, shinogi, machi, and nakago.
Keeping Terms for the Main Body and Terms for the Mountings Separate
Exhibition and object commentaries often present terms for the blade and its mountings in succession. Without distinguishing them, it can become unclear whether the text concerns the cutting blade or the exterior that houses it. This article covers only blade terms. For exterior names, see the overview of mountings.
From Tip to Hand: Kissaki, Shinogi, Machi, Nakago
The Gifu Prefecture explanation can be summarized briefly as follows.
- Tip: kissaki (切先). The tip portion of the blade
- Between the edge and the back: shinogi (鎬). The ridge line between the edge and the back (mune)
- End of the blade: machi (区). The boundary between the blade and the tang
- On the hand side of the machi: nakago (茎). The part that fits into the hilt and is not polished. It is described as the place where the signature (mei), peg holes (mekugi-ana), and file marks (yasurime) can be seen
In this explanation, the machi (区) is taken as the boundary that divides the blade from the nakago (tang). Remembering the two together, with the machi as “the boundary” and the nakago as “the part beyond it that fits into the tsuka (hilt),” makes it harder to mix up their positions.
Not Every Sword Has a Mei or a Shinogi
The nakago is introduced as the place to look at the mei (signature). However, not every sword has a mei on its nakago. Works whose titles include “mumei” are treated as having no mei.
The same applies to the shinogi ridge: some constructions, such as hira-zukuri, have no shinogi. If you cannot find the part named, you have not necessarily overlooked it; the sword may not have it. For overall form and curvature, see Shape and Curvature.
Observation Notes: Position → What the Term Is Used to Look At → Check Against the Labeling
As a way of putting terminology to use in appreciation, we suggest the following three-step notes.
- Position of the term: write down where the term points to (e.g., nakago = the part on the hand side of the machi that fits into the tsuka)
- What the term is used to look at: write down what is discussed at that location (e.g., the nakago is where the mei, mekugi-ana (peg hole), and yasurime (file marks) are viewed)
- Check against the work's labeling: compare with what the work's title and explanatory text say (e.g., whether the title says “mei” (signed) or “mumei” (unsigned), and whether the explanation mentions the nakago)
On swords displayed mounted in a koshirae, the nakago inside the tsuka cannot be seen from outside. In that case, keep the third step within what is written in the explanatory text, and do not fill in the unseen parts from imagination.