
Two terms that come up often in explanations of Japanese swords are hamon (刃文) and jigane (地鉄). Both refer to features that appear on the surface of the blade, but they are seen in different places. If the two remain confused, you can read an explanatory text and still end up not knowing which part of the actual object it refers to. Here, using just two photographs of publicly available collection pieces, we follow this order: first grasp the difference in hamon by eye, and then shift your gaze to jigane, a separate layer. The photographs shown are of museum collection pieces, not items handled by our company. Because the photographic conditions differ, size on screen is not a comparison of actual dimensions. We should also note in advance that the light and dark seen in the photographs include the effects of the method of polishing and of lighting and exposure. In the text, we separate what the museum's commentary states from what can be said from the photographs.
Hamon and Jigane Are Seen in Different Places
The hamon is the pattern formed by quenching at the boundary between the hardened edge and the blade's body. Viewed from the front, its shape follows that boundary along the cutting-edge side. Jigane, by contrast, is the appearance left by forging in the broader surface toward the spine. Terms include itame-hada, masame-hada, mokume-hada and ayasugi-hada (Japanese Sword Museum: The Appeal of Japanese Swords).
As a way of remembering it, the reliable approach is to divide them by position: what appears along the edge is the hamon, and what spreads across the surface of the ji is the jigane. If you rely on light and dark tones alone, you may mistake polishing marks or reflections of the lighting for the hamon.
A Blade Based on Suguha
The first image shows Tokyo Fuji Art Museum's unsigned katana attributed to Taima. It is dated to the late Kamakura period, 14th century, with blade length 70.9 cm. The commentary describes tightly forged itame texture and suguha mixed with ko-midare. It is also introduced as a tachi later shortened into a katana (Tokyo Fuji Art Museum, Object 01606).
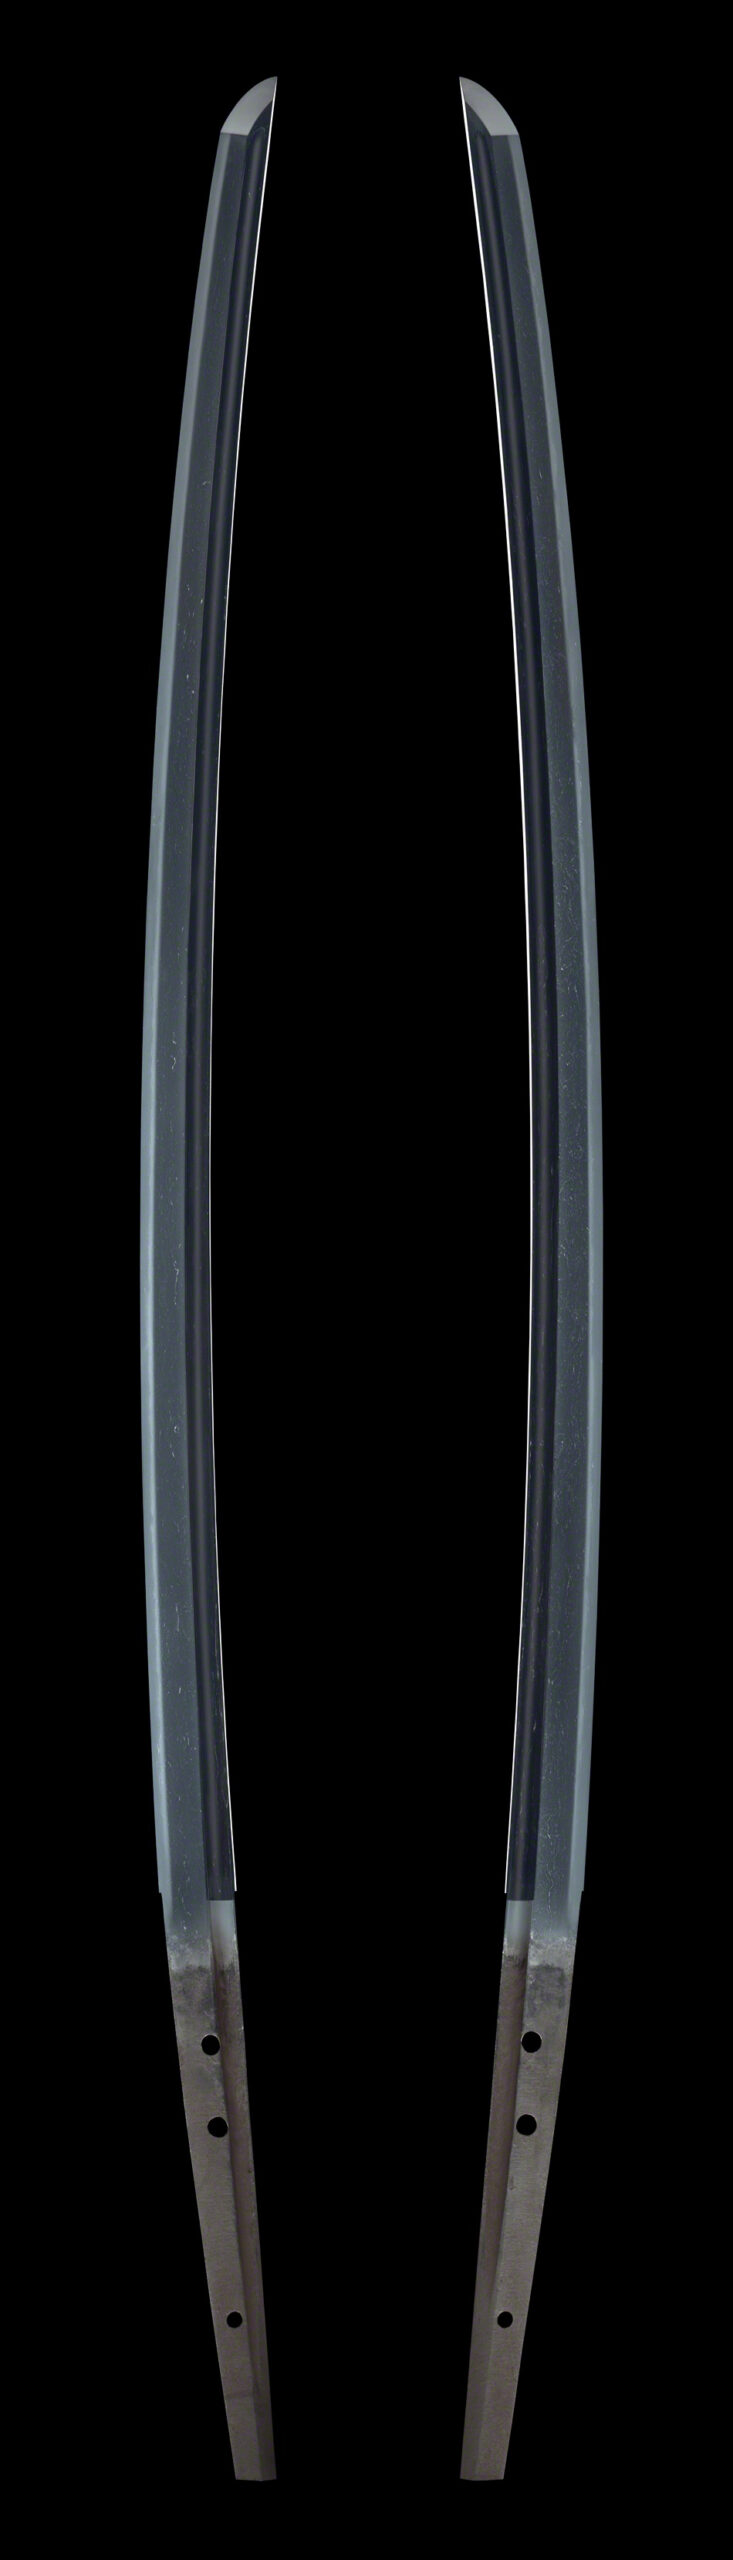
Tokyo Fuji Art Museum, Object 01606 / CC0 / Collection Record
The photograph shows both faces of the same sword, not two swords. The pale band along the edge appears almost straight. This corresponds to the impression of suguha, but the band's edge cannot simply be equated with the hardened-edge boundary. Suguha need not be ruler-straight: small irregularities may appear within its generally straight form (Kyoto National Museum: Japanese Sword Viewing Points). The museum's description of mixed ko-midare refers to these small fluctuations, which the photograph's resolution and lighting make difficult to discern.
A Blade with Spreading Choji
The second image shows Tokyo Fuji Art Museum's Important Cultural Property tachi signed Ichi, by the Fukuoka Ichimonji school. It is dated to the middle Kamakura period, 13th century, blade length 72.0 cm. The commentary describes jūka-chōji mixed with kawazuko-chōji (Tokyo Fuji Art Museum, Object 01614). These specialist names follow that museum's wording.
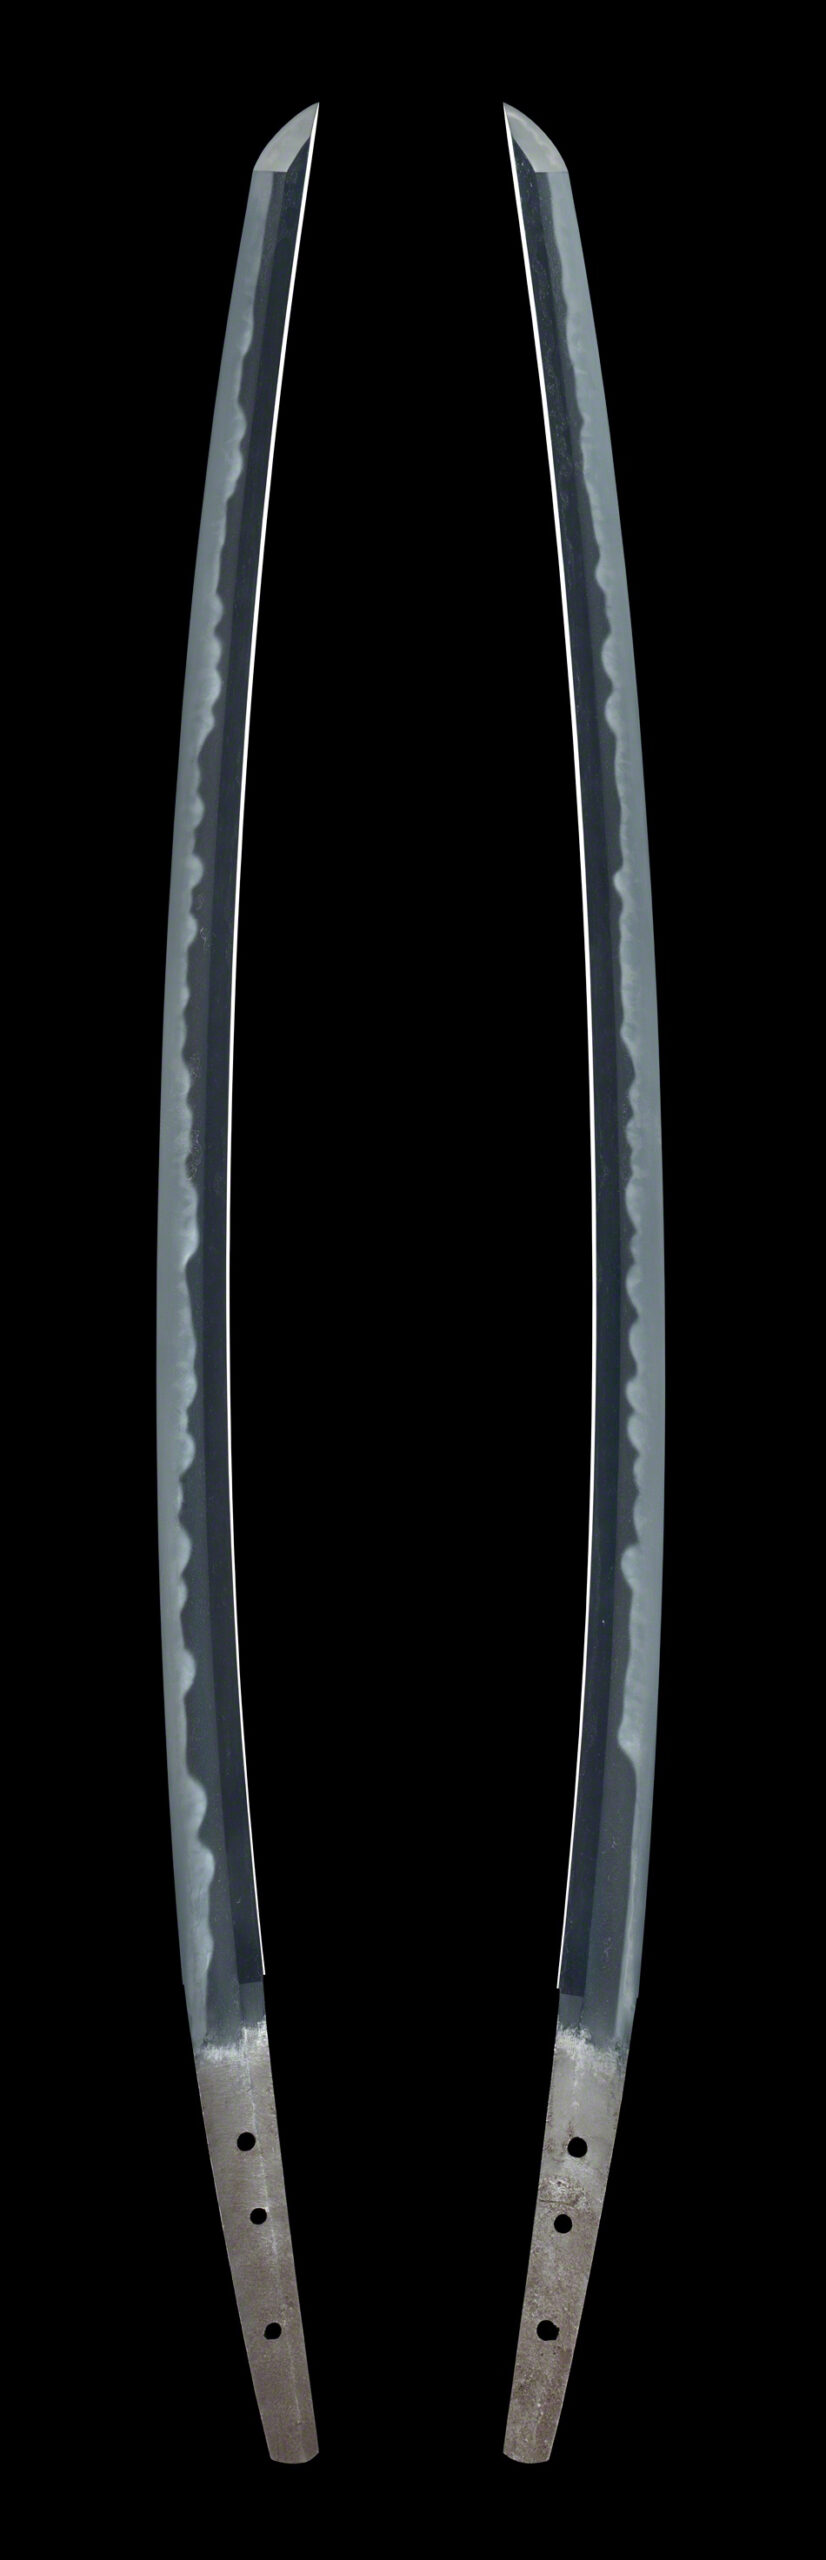
Tokyo Fuji Art Museum, Object 01614 / CC0 / Collection Record
This photograph also places the two faces of one sword side by side. Compared with the previous example, the pale band's edge rises and falls in successive peaks. In contrast to the straight impression of suguha, this belongs to the broad midareba group, of which chōji is a representative type (Kyoto National Museum: Japanese Sword Viewing Points).
Just by looking back and forth between the two images, you can grasp the first distinction: “Is the line along the edge straight, or does it undulate?” The finer names beyond this can be picked up little by little after you have seen actual swords several times. To repeat, the area that looks white in a photograph also includes the effects of polishing and of how the light falls, and does not necessarily coincide with the boundary of the yakiba.
The Names of Jigane, and the Limits of What Photographs Can Show
Steel-texture names draw analogies with wood grain. Broadly, masame has straight parallel lines, itame has flowing board-like grain, and mokume has whorled patterns (Japanese Sword Museum: The Appeal of Japanese Swords; Kyoto National Museum: Japanese Sword Viewing Points).
However, these cannot be identified from the photographs shown in this article. The reason we can write “tight itame” about the blade attributed to Taima mentioned earlier is that the museum's commentary says so; we are not determining the pattern of the hada from how the photographs look. Jigane is fine, and it appears and disappears depending on the angle of the light. Even in the gallery, how it looks often changes when you shift your standing position slightly.
For the same reason, the difference between nie (沸) and nioi (匂), which express the fineness of the hamon—explained as a difference in how the particles look and in their size—is also an item better suited to observation in front of the actual object than to photographs.
The Variables of Lighting, Polishing, and Photographic Conditions
The look of a blade is not determined by the sword alone. The method of polishing, the lighting of the display case, and, in the case of photographs, the light source and exposure greatly affect how it appears. For that reason, it cannot be said that “because it does not show in the photograph, that feature does not exist.” Conversely, even if something shows clearly in a photograph, its outline cannot simply be asserted to be the boundary of the yakiba.
Trying to determine maker or authenticity from individual details such as pattern, inscription or dimensions goes beyond the appreciation stage. Questions about a work you own require a specialist's examination of the actual object (Determining a Japanese Sword's Authenticity: The Appraiser's Role).
Observation Checkpoints, and Notes on Your Impressions
- Follow the band visible along the edge with your eyes, and first see whether it is straight or undulating.
- If it undulates, see whether the shapes of the peaks are uniform or whether large and small ones are mixed.
- Move your gaze toward the mune side, and look for whether a flowing or swirl-like look is visible on the surface of the ji.
- When it is hard to see, change your standing position slightly and try different angles of light.
- Finally, read the commentary on the label, and compare how it looked to you with the museum's words.
At this point, we also recommend not trying to rephrase things in technical terms, but jotting down brief notes in your own words, such as “a quiet, thin line” or “undulating in a lively way.” Once you have accumulated notes on several pieces, you will begin to see what kind of look you are drawn to.
A Guide to Your Next Viewing
Distinguishing hamon and jigane is not learned in a single visit. For a gallery viewing sequence, see Enjoying Japanese Swords. Once you have collected notes and want to describe your preferences, try Three Questions When Choosing a Japanese Sword. Next time you face a real sword, follow the line along its edge for one breath longer.