
What Are Koshirae and Tōsōgu?
When you enter a Japanese sword gallery, the beauty of the blades usually catches your eye first. Yet the same room may contain black-lacquered scabbards, cord-wrapped hilts and metal fittings small enough to fit in your palm. The external assembly used to carry a sword is called tōsō, and its arrangement or style is called koshirae. A mounting combines two main structural elements, the scabbard and hilt, with metal components. Just as the blade deserves close attention, the mounting can be appreciated in its own right.
Tōsōgu is a collective term for the metal fittings used in a mounting. Representative parts include the guard (tsuba), placed between the blade and hilt to protect the hand; the collar and pommel cap (fuchi and kashira) at the ends of the hilt; hilt ornaments (menuki), set around the middle of the hilt; and the knife handle and implement (kozuka and kōgai) carried alongside the scabbard. The Japanese Sword Museum also introduces sword fittings as guards and other small fittings, explaining metal-carving techniques for creating designs and the concept of a matching kozuka, kōgai and menuki set, known as mitokoromono.
Appreciating mountings differs somewhat from appreciating blades. A blade is essentially the work of a swordsmith, while a mounting is completed only through the combined work of scabbard makers, lacquerers, hilt wrappers and metalworkers who forge and carve the fittings. Even outstanding individual workmanship will not bring the whole mounting together if the colors and proportions are unbalanced. Viewing a mounting also means considering how these different hands have worked in harmony.
A Viewing Sequence to Use at Exhibitions
When you first encounter sword fittings, their small size and number can make it difficult to know where to start. A useful three-step sequence is to view the whole from a distance, move closer to examine the components, and then step back again. This keeps your impressions focused even during a short visit. Once the sequence becomes familiar, you can use it in any gallery.
First, stand a step back from the case and look at the whole. Consider its overall length, the curve of the scabbard, the relative lengths of hilt and scabbard, the lacquer color and how strongly the fittings' colors stand out. Sum up your impression in a word such as restrained, ornate or plain. This initial impression gives you a reference point when you examine the details.
Next, move closer and follow the components. A consistent route makes comparisons easier. Work from the blade end toward the end of the hilt: guard, collar, menuki around the middle of the hilt, and pommel cap. Finally, return to the kozuka and kōgai on the scabbard side. This broadly follows the mounting's assembly, helping you recall each component's role as you look.
Third, step back and look at the whole again. After examining the details, your initial impression may change. Something that seemed plain may reveal carefully coordinated colors in the fittings. This change is a valuable result of viewing; the difference between your first and later impressions is worth recording.
Reading the Overall Harmony
Harmony is often mentioned when discussing a good mounting. Although it may sound like vague praise, the clues are specific. First consider color: do the metals of the guard, fuchi-kashira and menuki belong to the same color family, or do they deliberately contrast? Then consider size: is the guard proportionate to the blade and hilt? Finally, consider subject matter: do the designs on the different fittings share a theme, or do unrelated subjects appear together?
Mountings have often been repaired or had parts replaced over many years. If some fittings were added later, their colors or subjects may not match. Rather than immediately treating such differences as a fault, note the observation that this part seems stylistically different. For beginners, this is a cautious approach that can also lead to discoveries.
Looking at the Guard
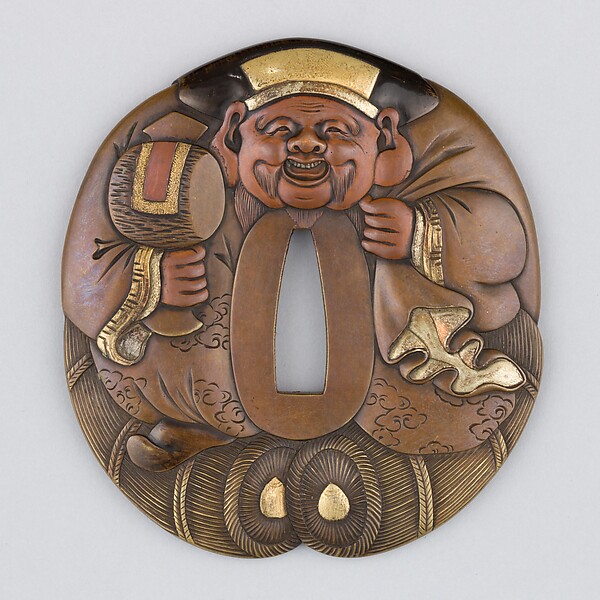
The Met 29.100.965, Public Domain. Collection Record
The guard in the photograph has an almost circular outline and a central opening for the blade's tang. Figures and bales appear around it and are given prominence as the main subjects. These observations can be made with confidence from the photograph. The exact metal, carving technique and depth of surface color cannot be established from the image alone; viewing the actual object straight on and at an angle is more reliable.
A guard is generally fitted between the blade and hilt to establish the hand's position and protect it. Outlines range from circular to shapes with clipped corners, lobed mokkō shapes and unusual forms. Shape itself is therefore an initial clue for identification. Smaller openings for the kozuka or kōgai may flank the central tang opening; their presence or absence can suggest how the mounting was assembled.
Openwork in Guards
Openwork, or sukashi, is often highlighted when viewing guards. Designs are made by cutting through the metal plate. Some retain broad areas of metal around cutout motifs, while others leave only fine, thread-like lines. The way the openings are cut changes the overall impression considerably. Because you can see through the openings, the guard forms a composition of metal and empty space.
When viewing openwork at an exhibition, first notice what appears behind the openings. Against black cloth, the openings read as black shapes; against a bright background, light itself becomes part of the design. Next, follow the remaining metal lines and see whether their thickness is constant or varies. Changes in thickness offer clues to where the maker placed visual tension in the composition.
Menuki: From Fasteners to Ornament
Menuki are small metal fittings placed around the middle of the hilt. Originally, they functioned as fasteners securing both ends of the peg that joins the hilt and blade. They later became separate components from the peg, with an increasingly decorative role. Pages 162–163 of Nihontō no Kyōkasho, Expanded and Revised Edition also outline this change and the names of the parts.
There are three useful clues when viewing menuki. First is the relationship between the two sides: they are fitted as a pair on the front and back, often forming a single subject together. Second is relief: their position beneath the gripping fingers can be reflected in clearly modeled three-dimensional forms. Third is their relationship to the hilt wrapping: the way they appear between the cords is itself part of the design.
Fuchi and Kashira: Fittings at Both Ends of the Hilt
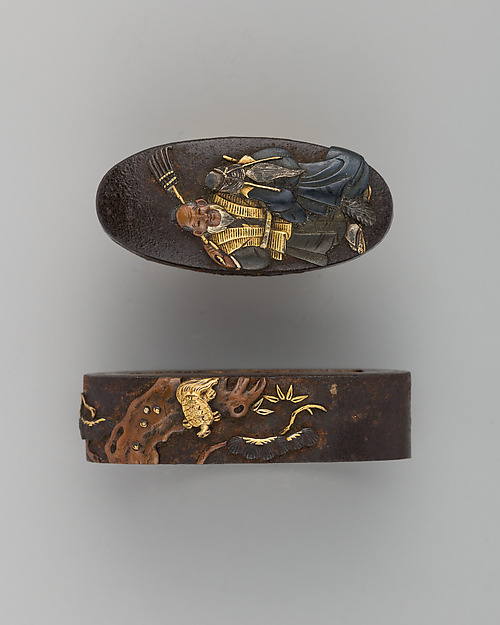
The Met, Sword-Hilt Collar and Pommel (Fuchigashira), 29.100.1336a, b, Public Domain. Collection Record
The photograph shows two fittings, one above the other. The upper fitting depicts a figure, while the lower one shows a branch and a bird. The upper piece is the kashira and the lower the fuchi; the photograph shows that different subjects were chosen for the two. The metals responsible for the gold tones and ground color cannot be identified from the photograph alone.
The fuchi generally reinforces the end of the hilt nearest the guard, while the kashira covers its far end. Often made as a pair, they are collectively called fuchi-kashira. Compare their metal colors, edging and depth of carving as a set. Their subjects need not be identical: different scenes from the same story or motifs from the same season may be used to create a complementary pair.
Kozuka: The Handle of a Small Utility Knife Carried in the Scabbard
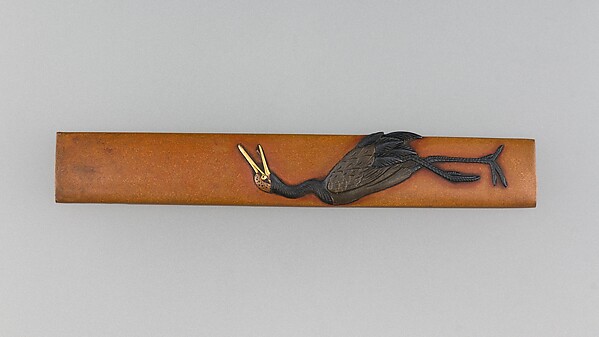
The Met, Knife Handle (Kozuka), 36.120.309, Public Domain. Collection Record
The kozuka in the photograph has a long, narrow shape with a bird on its surface. The bird is placed toward one end, leaving a broad area of empty space. Although the back and sides of a kozuka also reward examination in hand, exhibitions often show only one face. It is practical to record the composition of the visible surface carefully.
The kozuka is the handle of a small utility knife carried alongside the scabbard. The blade portion is called the ho, and a part at the end of the handle is called the nomikuchi. The diagram on page 163 of the same book identifies the position and name of this part. Exhibitions sometimes display the handle with the blade removed, so there is no need to be puzzled by a handle shown on its own.
Kōgai and Its Slender Shaft
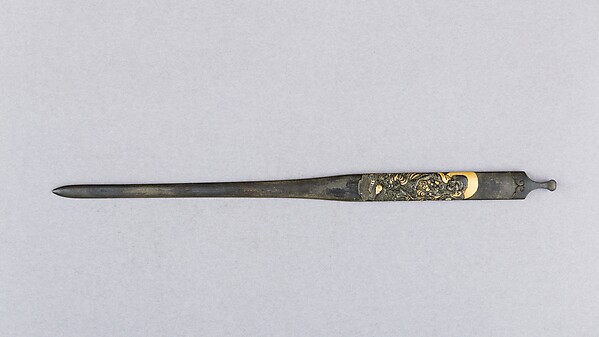
The Met, Hair Dressing Tool (Kogai), 29.100.1217, Public Domain. Collection Record
The kōgai in the photograph is a long, rod-like fitting. A slender shaft occupies most of its length, while one end broadens out. Decoration is concentrated on the wider end, with little on the narrow shaft. The contrast between the long straight shaft and the expanded end is a key feature of its form.
The long, rod-like section is named the sao, or shaft, in the diagram on page 163 of the same book. Like the kozuka, the kōgai is a small implement carried alongside the scabbard. Decoration is commonly concentrated on the wider end, while the shaft is left plain or given a restrained finish. If the shaft points toward you in a display, the decoration may be difficult to see; try changing your position slightly in front of the case.
Viewing a Matching Set of Three Fittings
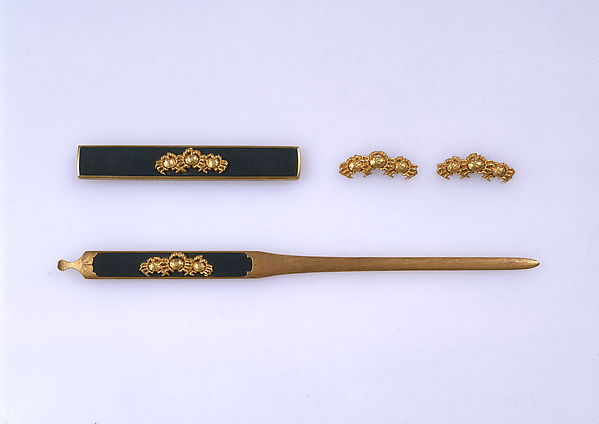
The Met, Set of Sword Fittings (Mitokoromono), 45.24.52a–d, Public Domain. Collection Record
The photograph shows a kozuka, kōgai and pair of menuki arranged together. All feature gold-colored decoration and are presented as a group of three types of fitting. Although their outlines and sizes differ, the shared decorative color makes them read as a matching set.
A set of kozuka, kōgai and menuki with coordinated designs or other features is called mitokoromono. The Japanese Sword Museum also presents this matching-set concept as an important way of understanding sword fittings. A matching set of two types, such as kozuka and kōgai, is called futatokoromono. The label indicates which grouping is represented.
When viewing mitokoromono, first look for shared features: metal color, depth of carving, elements of the design and use of empty space. Then look for differences. The narrow horizontal surface of a kozuka, the elongated surface of a kōgai and the small menuki require different arrangements even for the same subject. How a shared theme is reconfigured to suit each form is the principal interest of a matching set.
Mounting Styles and Aikuchi Mountings
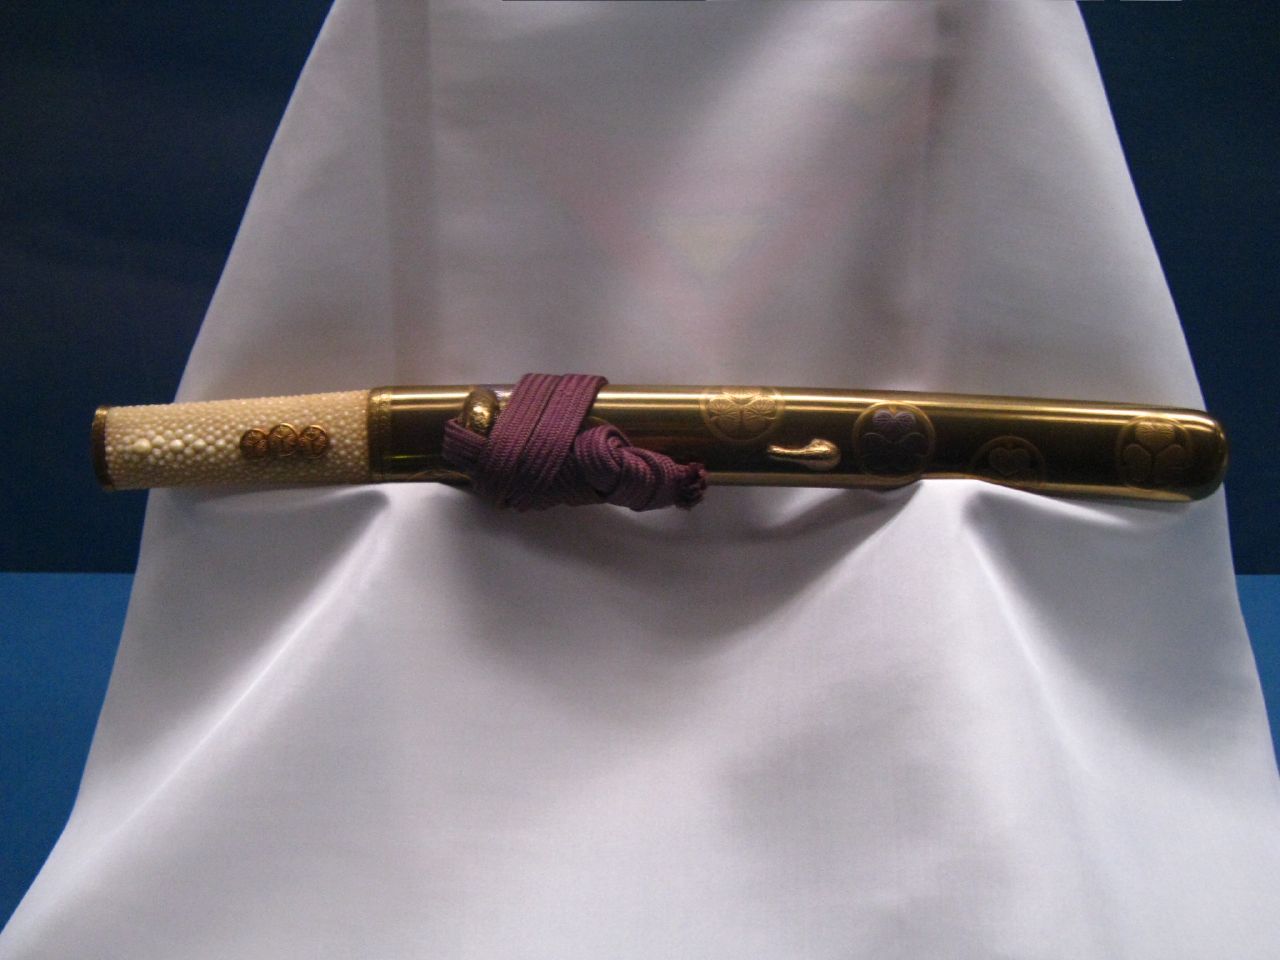
A separate example: this mounting is a different piece from the guard, fuchi-kashira, kozuka and other fittings discussed in the article. Photograph by Ian Armstrong, CC BY-SA 2.0, unmodified. Original Image
This photograph shows a mounting without a guard between the hilt and scabbard mouth. The end of the hilt and the mouth of the scabbard face each other directly, with the junction appearing as one continuous line. This mounting is a separate work from the guards, fuchi-kashira and kozuka shown earlier. Those photographs do not show disassembled parts of a single mounting, so they should not be read as belonging together.
A mounting in which the hilt and scabbard mouth meet without a guard is called aikuchi koshirae. With no guard and fewer metal fittings, its outline is clean and compact. Attention shifts to the lacquer texture, hilt finish and fit between the two mouths. If you are accustomed to focusing on guards, it may initially seem lacking, but changing your focus reveals a different kind of visual tension.
Distinguishing Metal Colors
Common metals for sword fittings include iron, copper, brass and copper-based alloys. Two useful names to remember are shakudō and shibuichi. Shakudō is a copper alloy containing a small amount of gold; surface treatment gives it a black to purplish-black appearance. Shibuichi is a copper-silver alloy with a subdued gray to silvery-gray appearance and is also sometimes called oborogin.
Color can be difficult to judge when strong gallery lighting makes a black metal surface reflect gray. Look at the edges, the depths of the carving and unworn recesses. Color retained in recesses is often closer to the underlying finish than a polished flat area. Definitive identification of the metal requires specialist expertise; at the observation stage, recording what you see is sufficient.
How to Approach Signatures
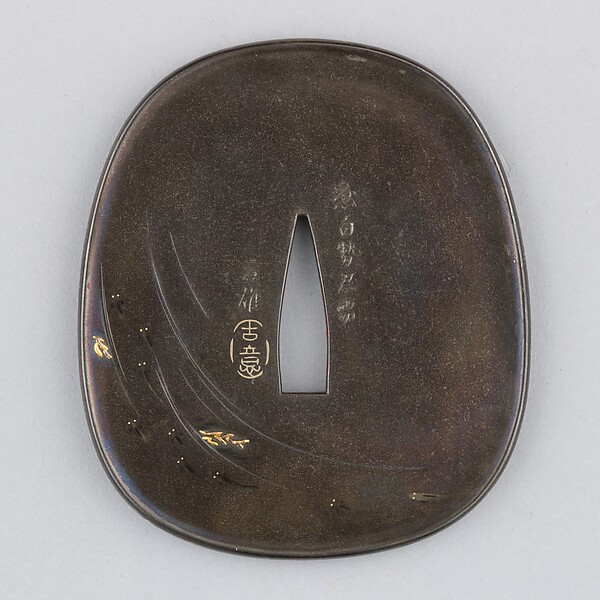
A separate example showing the position of a signature. The Met, Sword Guard (Tsuba), 36.120.101, Public Domain. Collection Record
In the photograph, characters are visible beside the central opening. Their strokes are incised in fine lines close to the opening. We do not attempt to read them here or assert who made the piece, whether it is authentic, or whether the inscription was added later. The photograph establishes only that an inscription is present in this position; further evidence is needed for any attribution.
On guards, signatures are generally incised near the tang opening or toward the edge; on kozuka and kōgai, they may appear on the back or near an end. A signature provides clues, but its presence or absence does not determine a work's quality. Many unsigned works are discussed in terms of stylistic lineage. At an exhibition, compare the label with the inscription's position and establish which surface bears it, without going further than the available evidence.
Reading Designs and Subjects
Sword fittings use a wide range of subjects: plants and flowers, birds and animals, landscapes, tools and scenes from stories. Begin by describing what is depicted. Simply listing what you see, such as a bird and a branch or figures and bales, is enough. Next, examine the empty space. Filling a small surface with motifs or leaving it largely empty with a design at one end can create opposite impressions from the same subject. Rather than rushing to identify a theme or literary source, record the number and placement of forms and the empty space; this will help with later research.
Comparisons When Identification Is Difficult
Kozuka and kōgai can be confused because both are elongated metal fittings. In the photographs here, the kozuka is flat and narrow, while the kōgai has a distinct slender shaft and broader decorated area. Comparing these two photographs should make the different width-to-length proportions easier to recognize.
To distinguish fuchi from kashira, recall where they are fitted. The fuchi is nearest the guard, while the kashira caps the far end of the hilt and has a closed covering form. The front and back of menuki are determined by how the sword is worn when fitted to a mounting. When displayed separately, there are fewer clues, so consider their symmetry and the direction of the subjects.
The front of a guard is generally the face directed outward when the sword is worn at the waist. Exhibitions often show only one face and may not identify which it is. If uncertain, begin your note with a reference to the visible face. This keeps the record sound and is more useful later than assigning a front or back without enough evidence.
Reading Exhibition Labels
Labels generally list the component name, signature or unsigned status, maker or school, metal, technique, period, and collection or donor information. Beginners can start with just the name and metal. The name explains the component's role, while the metal helps explain its color. The other details can be added as you read further.
Knowing a few conventions of notation will reduce misreadings. “Mumei” (unsigned) indicates only that no signature is inscribed; it does not assert that the maker is unknown. When “den” (伝) is attached, it carries the sense that the work has been handed down as such, and it is distinguished from a definitive statement. Terms such as “○○ school” and “○○ lineage” refer to a lineage, not to an individual's name.
The technique names on labels also serve as guides for observation. If the label says sukashi (openwork), look for the parts that have been cut away; if it says zōgan (inlay), look for the boundary where a different metal has been set in; if it says takabori (high relief), look at the rise of the design from the side. If you use the technique name as a clue for deciding where to rest your eyes, you will see more in the same amount of time.
Do Not Remove or Polish Fittings
There are two rules that matter most in handling sword fittings. The first is not to remove the metal fittings yourself from an assembled koshirae. The parts of a koshirae fit together according to one another's dimensions, and removing or reassembling them requires a specialist's hands. If you try to take them off out of curiosity, both the parts and the blade will be damaged. When you want to understand the structure, the right way is to look at examples displayed in a disassembled state, or at diagrams.
The second is not to polish them. The surface color of sword fittings is made up of the base metal, the finishing treatment, and a texture that has settled over many years. Polishing will make them brighter, but it is an act of removing the color and cannot be undone. Even with pieces that look dirty, the proper course is to leave the judgment to the owner or a specialist. Even with a piece in your own possession, please do not use chemicals or abrasives yourself.
Frequently Asked Questions
Is there any point in seeing an exhibition of sword fittings alone? There is plenty. With individual fittings that are not assembled into a koshirae, both faces and the sides can often be seen, and you can follow the form and the carving at your own pace. Viewing fittings together with the blade and viewing the fittings on their own are both useful, as separate kinds of training.
Are the kozuka and kōgai always used together? Not always. There are examples in which the tsuba has an opening only for the kozuka, examples with openings for both, and examples with neither; it varies with how the koshirae was made up. Looking at whether the tsuba has these openings gives you a clue as to which accessories that koshirae was designed for.
Is a koshirae without a tsuba unfinished? No. There are forms, such as the aikuchi koshirae, that are premised on not using a tsuba. Think of it not as something missing, but as that kind of mounting. The points of interest simply shift from the metal fittings to the lacquer and the precision of the joins.
Does a signature settle who the maker is? It cannot be said to. A signature is an important clue, but evaluating it requires specialist connoisseurship, and as someone viewing an exhibition you do not need to judge authenticity. If you make it your task to go only as far as observing that it is inscribed in this way in this position, your records will be accurate.
Summary
A koshirae is an outer mounting whose framework is the scabbard and the hilt, combined with sword fittings such as the tsuba, fuchi-kashira, menuki, kozuka, and kōgai. Fix the order of viewing as whole, parts, whole; follow the parts from the blade side toward the end of the hilt; and finally return to the accessories on the scabbard side. As long as you have this route, you will not lose your way even in an exhibition room you are visiting for the first time.
There are only two things to remember. One is to read the overall harmony through three clues: color, size, and subject. The other is: do not remove, do not polish. If you keep to these two and write down the facts you have seen in your own words, the time you spend standing before small metal fittings will surely become richer.
References
- The Japanese Sword Museum, “Sword Mountings and Sword Fittings”
- The Japanese Sword Museum, “Handling and Preservation Methods”
- Nihontō no Kyōkasho, Expanded and Revised Edition (『日本刀の教科書 増補改訂版』), pp. 162–163