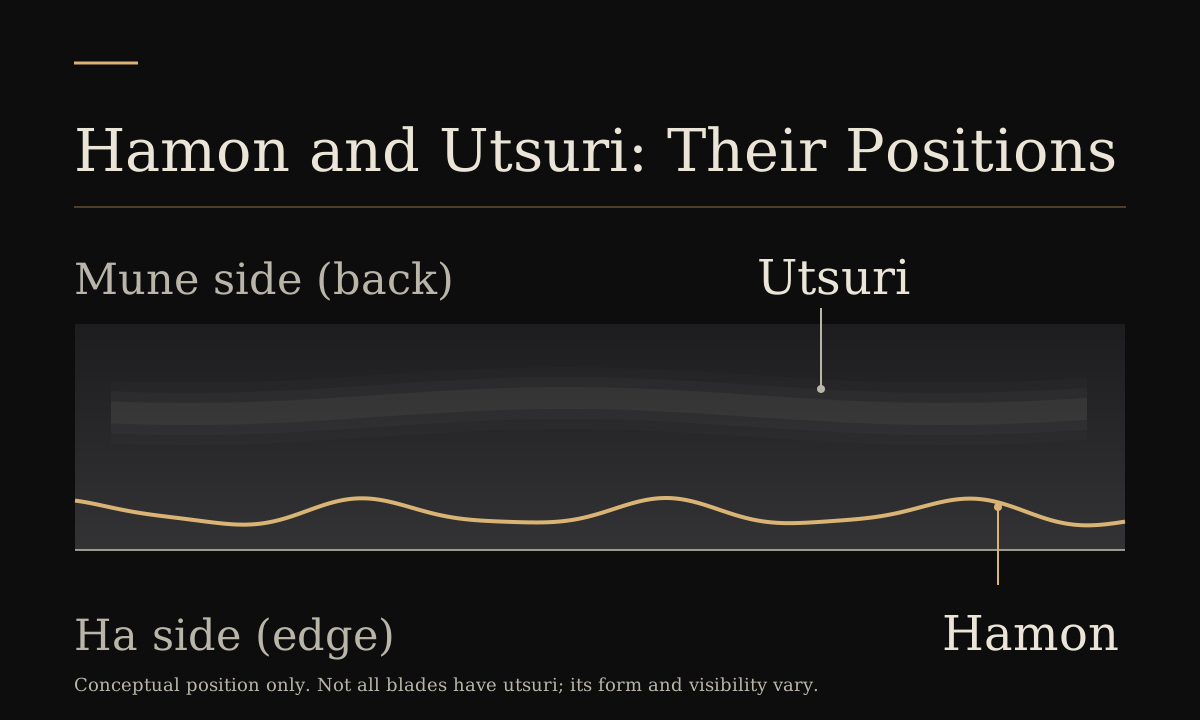
Utsuri is a pale, mist-like effect visible in the body of a Japanese sword's steel, distinct from the hamon. The Japanese Sword Museum of the Society for Preservation of Japanese Art Swords describes it in these terms and identifies it as a feature to appreciate in Bizen swords (Japanese Sword Museum). With the edge downward, utsuri appears in the steel on the spine side of the hamon. Because it is faint, lighting and viewing angle can make it difficult to discern. It is not unusual to be unable to see it even when the commentary mentions it.
Schematic showing the positions of hamon and utsuri, drawn by Myoo Co., Ltd. The pale band indicates the position of utsuri; the gold line marks the hamon boundary. Based on the Japanese Sword Museum's explanation. The positions and terminology in the diagram await specialist review.
Utsuri Does Not Appear in Only One Way
Gifu Prefecture's sword explanation calls rod-like utsuri bō-utsuri (Gifu Prefecture). Kōchi Castle Museum of History describes the utsuri of Imamura Kanemitsu as midare-utsuri (Kōchi Castle Museum of History). These examples show that utsuri has appearances beyond straight bands.
Although utsuri is highlighted as a feature of Bizen swords, not all Bizen swords have it. Its presence does not by itself establish that a sword is Bizen. Regional characteristics are outlined in the Five Traditions.
Why It Is Hard to Judge from Photographs
Utsuri is an effect that appears in the ji of the blade itself. However, in displays seen through a glass case or in photographs, reflections of the lighting or the light used when photographing can overlap the blade as a white band. Even if it looks similar, you cannot decide from an image alone whether it is utsuri. From a photograph, please go no further than saying “there is a whitish band-like area.” As for whether it is utsuri, it is safest to rely on what is stated in the exhibition commentary or the object data.
Record in Three Steps: Commentary, Location, and How It Looked
When looking for utsuri, we suggest recording the following three things separately.
Check whether the exhibition commentary or object data mentions utsuri (bō-utsuri, midare-utsuri, etc.).
If it is mentioned, work out roughly where to look, focusing on the ji away from the hamon.
Write down whether you felt you could see it on the spot, or could not make it out under those conditions.
For example, write it as follows.
“Commentary: midare-utsuri / Location: the ji on the mune side of the hamon / Myself: faintly visible when I lowered my eye level”
“Commentary: utsuri / Myself: could not make it out under this lighting”
A record that you could not make it out is not evidence that there is no utsuri. It becomes a clue for the next time you look. Please do not bring in any device for shining light or touch the case. Limit what you try to changing your distance and eye level.
How It Connects with the Hamon and Jigane
First distinguish the hamon's form from the steel's surface texture. Then look for a faint effect overlying the steel. This sequence makes utsuri easier to place in context. The basics are summarized in Viewing Hamon and Jigane. The presence or form of utsuri alone cannot determine a sword's origin, maker or value.
Polishing a Japanese sword is specialized work carried out by a togishi (polisher). Please think of it as something separate from the preservation that an owner carries out day to day. Once you start considering polishing, sort out the sword’s condition and your purpose before trying anything yourself. The proper order is then to consult a specialist who will examine the actual sword.
The Roles of Shitaji and Shiage
The Japanese Sword Museum's Swordmaking and Polishing divides polishing into foundation and finishing stages. Foundation polishing shapes the sword's form; finishing adjusts the appearance of the steel and hardened edge. For the complete sequence from swordmaking to polishing, see The Production Process.
The Boundary with Everyday Preservation
The storage environment and everyday handling fall within the owner's preservation responsibilities. The basics are summarized in Storage and Care. Polishing is not an extension of care for owners to perform themselves; it is work entrusted to a professional sword polisher.
When you find rust or another area of concern, please do not decide on your own whether it can be dealt with within the scope of preservation or whether you should consult about polishing. Have a specialist examine the actual sword and make the judgment.
Three Items to Write Down Before Consulting
Before talking with a specialist, we recommend noting down the following three items.
Condition: the location of rust or other areas of concern, and when you noticed them
History: what is known about past polishing (when it was done, accompanying documents, etc.)
Purpose: whether you want to improve the appearance for appreciation, or first want to hear an opinion on the condition
These notes are for aligning your starting assumptions with the specialist. They are not for deciding by yourself whether polishing is necessary.
Points to Weigh When Considering Whom to Commission
When considering whom to commission, use as a guide whether they can explain the following points to you after examining the actual sword.
Cost: what is included in the estimate
Time: the approximate time required
Result: how much improvement can be expected, and where the limits lie
All of these vary depending on the condition of the sword. How the sword is evaluated after polishing also varies depending on its condition and other factors. After hearing the explanation, please also consider afresh whether to have the polishing done.
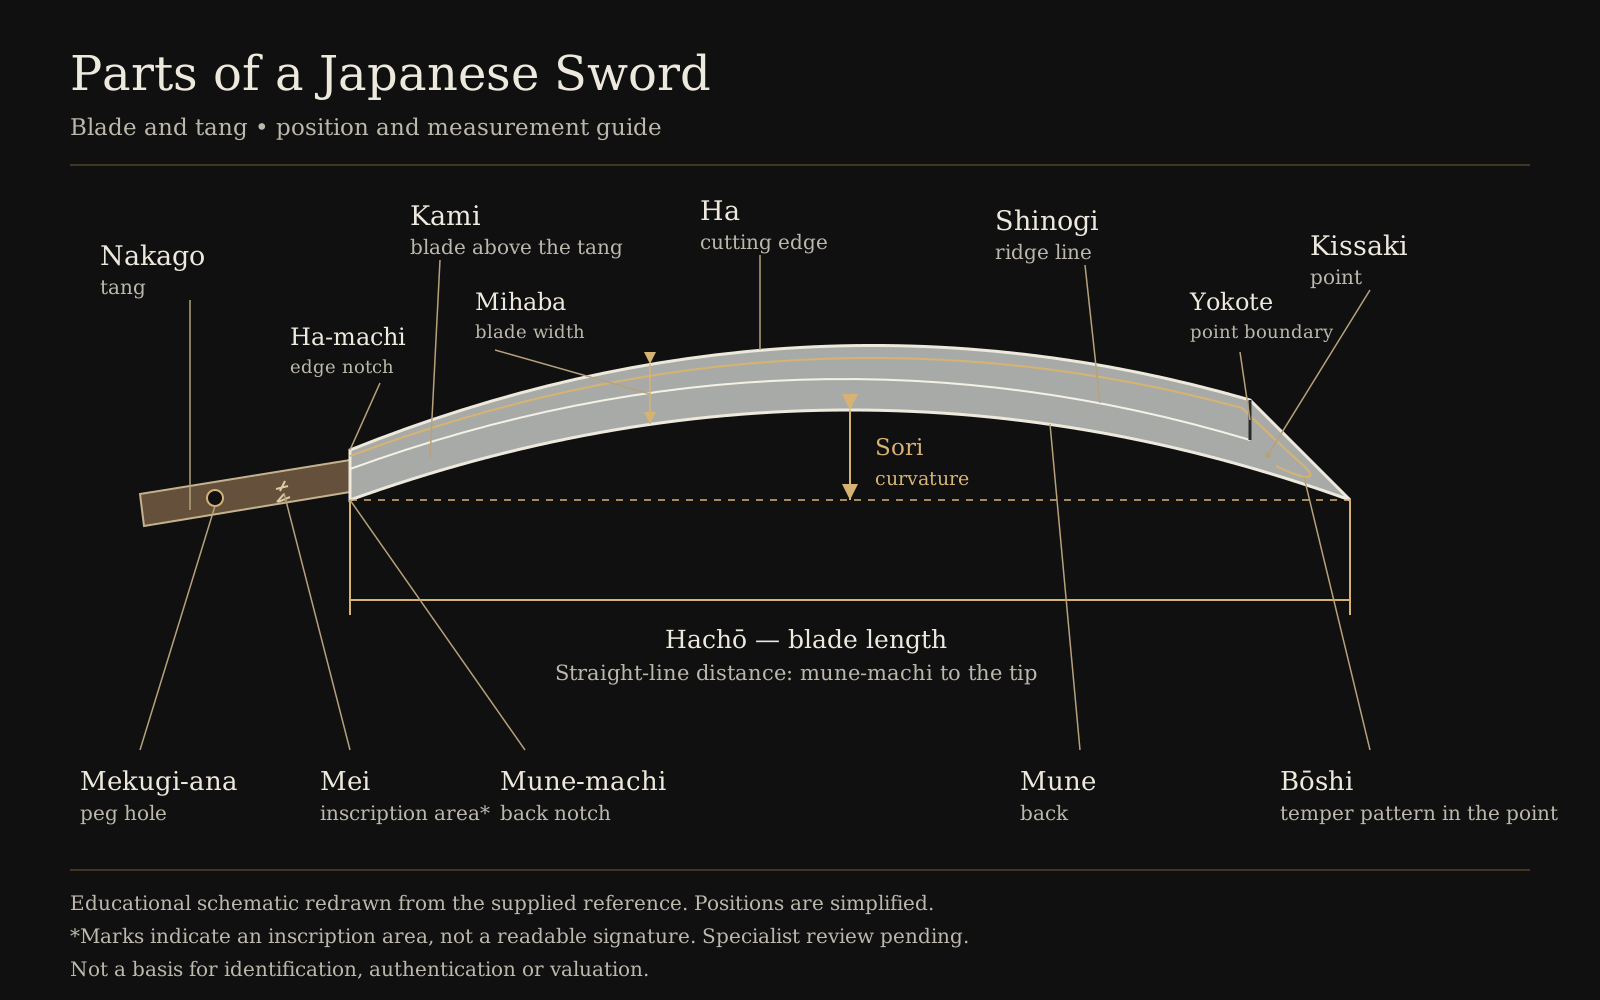
The names of the parts of a Japanese sword are less easily confused when learned together with position, that is, where each term points. First, separate the main body of the sword from its mountings (scabbard, hilt, tsuba, and so on). Next, trace the main body from the tip toward the hand. Here, as basic terms for the main body, we organize four terms in order of position: kissaki, shinogi, machi, and nakago.
Reference diagram of the parts of a Japanese sword. The machi corresponds to the ha-machi and mune-machi in the diagram. The shinogi is not shown in this diagram. The positions and notation of the parts have not yet been checked by a specialist.
Keeping Terms for the Main Body and Terms for the Mountings Separate
Exhibition and object commentaries often present terms for the blade and its mountings in succession. Without distinguishing them, it can become unclear whether the text concerns the cutting blade or the exterior that houses it. This article covers only blade terms. For exterior names, see the overview of mountings.
Between the edge and the back: shinogi (鎬). The ridge line between the edge and the back (mune)
End of the blade: machi (区). The boundary between the blade and the tang
On the hand side of the machi: nakago (茎). The part that fits into the hilt and is not polished. It is described as the place where the signature (mei), peg holes (mekugi-ana), and file marks (yasurime) can be seen
In this explanation, the machi (区) is taken as the boundary that divides the blade from the nakago (tang). Remembering the two together, with the machi as “the boundary” and the nakago as “the part beyond it that fits into the tsuka (hilt),” makes it harder to mix up their positions.
Not Every Sword Has a Mei or a Shinogi
The nakago is introduced as the place to look at the mei (signature). However, not every sword has a mei on its nakago. Works whose titles include “mumei” are treated as having no mei.
The same applies to the shinogi ridge: some constructions, such as hira-zukuri, have no shinogi. If you cannot find the part named, you have not necessarily overlooked it; the sword may not have it. For overall form and curvature, see Shape and Curvature.
Observation Notes: Position → What the Term Is Used to Look At → Check Against the Labeling
As a way of putting terminology to use in appreciation, we suggest the following three-step notes.
Position of the term: write down where the term points to (e.g., nakago = the part on the hand side of the machi that fits into the tsuka)
What the term is used to look at: write down what is discussed at that location (e.g., the nakago is where the mei, mekugi-ana (peg hole), and yasurime (file marks) are viewed)
Check against the work's labeling: compare with what the work's title and explanatory text say (e.g., whether the title says “mei” (signed) or “mumei” (unsigned), and whether the explanation mentions the nakago)
On swords displayed mounted in a koshirae, the nakago inside the tsuka cannot be seen from outside. In that case, keep the third step within what is written in the explanatory text, and do not fill in the unseen parts from imagination.
The nakago (tang) is the part at the base of the blade that fits inside the hilt. Suriage means shortening a sword by cutting the tang. Although known as the location of inscriptions, the tang offers more than lettering: shape, hole positions and traces of shortening may also reveal changes in the sword's history. For inscriptions and labels, see Reading Inscriptions and Exhibition Labels.
Ubu, Suriage, and O-suriage
According to Gifu Prefecture's sword explanation, ubu means an unshortened condition. In major shortening, or ō-suriage, the signature may be lost (Gifu Prefecture).
For this reason, even when an exhibit is marked “mumei” (unsigned), there is more than one possible circumstance. Whether the sword never had a mei or lost it through suriage needs to be confirmed by reading the explanatory text and records.
Information That Remains in Layers on the Nakago
Kōchi Castle Museum of History explains that tang-hole positions and changes from shortening can help reveal a sword's history (Kōchi Castle Museum of History). A tang retains the shape and inscription it had when made, and later changes accumulated as the sword was handed down, such as traces of shortening, are layered onto it.
The same page explains two contrasting examples regarding the number of holes.
Imamura Kanemitsu: it has four mekugi-ana, yet is explained as having an ubu nakago.
Ikkoku Kanemitsu: it has two mekugi-ana and is explained as suriage.
What this comparison shows is that one cannot say that many holes mean suriage and few holes mean ubu. Nor does the number of holes directly represent the number of owners.
Observation Within What Can Be Confirmed in Exhibitions and Photographs
When looking at the nakago, limit yourself to what can be confirmed in exhibitions and published photographs. We suggest looking in the following order.
Read whether the explanatory text or object data states “ubu,” “suriage,” “o-suriage,” or “mumei.”
Look at the shape of the nakago and how it connects to the blade.
Count the number of holes and note their positions, as far as you can see them.
Check whether there is a mei and where it is inscribed.
As in the two examples above, try writing the number of holes and the “ubu / suriage” description side by side on the same line. That way you avoid jumping from one to the other. Note that because the nakago is the part that fits inside the hilt, it may not be visible depending on how the sword is displayed.
So as Not to Rush to Conclusions
It cannot be said that a sword is of low value because it is mumei. Nor is a sword's evaluation determined solely by whether or not it has undergone suriage. Changes to the nakago are one piece of material for thinking about its history. Evaluating an individual sword requires specialist examination and records of its provenance.
Do not remove the hilt or rust simply to examine the tang. Its condition is itself part of the sword's history. For everyday handling of a sword you own, see Storage and Care.
The bōshi is the hardened edge extending into a Japanese sword's point. Gifu Prefecture defines it as the cutting-edge area within the point and explains that it normally turns back toward the spine; a form without a turnback is called yakitsume (Gifu Prefecture). Kissaki names the point's outer form, while bōshi names the hardened pattern within it. They concern different aspects of the same tip.
Ko-maru and the Expression “Turns Back in …”
Komaru is a form in which the hardened edge makes a small rounded turn toward the spine near the tip. It offers a guide when reading an object's description of the turnback (Nagoya Japanese Sword Museum).
The same museum introduces expressions such as “sugu ni ko-maru ni kaeru” (straight, turning back in ko-maru) and “midare-komi ko-maru ni kaeru” (midare-komi, turning back in ko-maru). Such phrases are easier to understand when read in two parts. “Sugu ni” and “midare-komi” describe how the hardened edge continues into the kissaki. “Ko-maru ni kaeru” describes how it turns back at the tip. When wording of this kind appears in a description, try picturing two things in turn: how the hardened edge proceeds, and how it turns back.
How to Look at the Outer Shape and the Hardened Edge
When looking at the tip, we suggest dividing it into two steps.
First consider the outline: is the point large or small, elongated or compact? For overall form, see Shape and Curvature.
The second step is the hardened edge. Look at how the line of the hardened edge proceeds within the kissaki. Check whether it turns back toward the mune side, or is yakizume, ending without turning back.
When taking notes, you can write, for example, as follows.
“Outer shape: the kissaki is large and extended / Hardened edge: the description says midare-komi, turning back in ko-maru; I myself could not follow it as far as the turnback at the tip.”
Dividing it into two steps also helps avoid confusing the terms. “Ō-kissaki” is a term for the size of the outer shape of the kissaki. By contrast, the “maru” names such as “ko-maru” and “ō-maru” are terms used for the shape of the bōshi’s turnback. Both can carry “ō” (大, large), but ō-kissaki and ō-maru are classifications measured on different scales. It cannot be concluded that “because it is an ō-kissaki, the bōshi is also ō-maru.”
What a Small Photograph Can and Cannot Tell You
The bōshi lies within a very narrow area at the tip, and the line of the hardened edge is also fine, so it is a part that is hard to make out in a small photograph. It is reasonable to assume that what can be read from a photograph goes only as far as the general tendency of the outer shape. The soundness or authenticity of a bōshi cannot be judged from a small photograph. Nor does the shape of the bōshi alone determine a sword’s period, maker, or value.
The bōshi is also the culmination of the temper pattern. Reading it alongside Viewing Hamon and Jigane helps reveal how the pattern continues to the tip.
Chokutō is a term for a sword with almost no curvature and a nearly straight form. However, even when a sword is called a chokutō, its curvature is not necessarily exactly zero. The Suiryūken, held by the Tokyo National Museum, is recorded as having a slight uchi-zori (inward curvature) in its blade.
Unsigned straight sword (Suiryūken), Tokyo National Museum collection. Source: ColBase (CC BY)
Koshirae (mountings): 1873; metal fittings by Kanō Natsuo
A Slight Curvature Even with “Straight” in the Name
A shape that curves toward the edge side is called uchi-zori (inward curvature). Although the Suiryūken has “chokutō” in its title, it is recorded as having a slight uchi-zori. Check the presence, direction, and extent of curvature not by the name, but through the records and display of each individual work.
Viewing It Alongside a Curved Tachi
When viewing a chokutō alongside a curved tachi, the differences become easier to grasp if you look at the following two points separately.
Extent of curvature: whether it is barely noticeable or clearly visible
Direction of curvature: whether it curves toward the edge side or toward the opposite side
This comparison is intended to help you observe differences in form. It does not illustrate the development from straight swords to tachi or explain how each was used. For the basics of reading curvature, see Shape and Curvature.
The Blade and the Koshirae Are from Different Periods
For the Suiryūken, the blade and the koshirae are recorded separately: the blade as 8th century, and the koshirae as made in Meiji 6 (1873). There is a gap of more than a thousand years between the blade and the koshirae. Even when a work is titled “chokutō,” its mountings are not necessarily of the same period. If a label gives more than one date, read them apart to see which part each date refers to.
Three Note Columns for Viewing an Exhibit
When viewing a chokutō at a museum, we suggest noting the following three items in separate columns.
Overall curvature: whether it looks straight or slightly curved. If it is curved, toward which side it curves
Wording of the title: terms included in the name, such as “chokutō” (直刀), “mumei” (無銘, unsigned), and “gō” (号, name)
Date of production: the date of the blade and the date of the koshirae
Keeping separate fields helps distinguish observations about blade form from those about mountings when comparing works. For an overview of Japanese sword types, see Types and Lengths.
A figure for the weight of a Japanese sword cannot be compared unless you know what was included in the weighing. Whether it is the blade alone or the blade housed in a shirasaya or koshirae, the number changes even for the same sword. The basic approach is first to confirm what was weighed, and then to read the figure alongside the blade length.
Three entries from the Nagoya Touken Museum's table
The Nagoya Touken World Museum commentary page includes a table giving the weights and blade lengths of swords it features. We have selected just three entries from that table.
Katana, mei: Suishinshi Masahide, Tenmei gonen nigatsu-bi, hori dōsaku
928g
69.4cm
These three entries are examples featured by the museum. They are not figures representing an average or standard for Japanese swords as a whole. In addition, whether accessories were included when the swords were weighed could not be determined from what the source states. Please treat the measurement conditions as unknown, and read the figures without assuming that they are the weight of the blade alone.
A 270 g spread within a 1.3 cm difference in blade length
The blade lengths of the three entries range from 68.1 cm to 69.4 cm, a maximum difference of 1.3 cm. The weights range from 658 g to 928 g, a spread of 270 g. At least within the scope of this table, blades of similar length are not necessarily of similar weight.
The reason for the difference cannot be read from the table. Differences in the width or thickness of the blade, and differences in what was included in the weighing, are both conceivable possibilities. However, there is nothing to show which of them applies. It is safest to treat blade length and weight as values to be checked separately.
Conditions for comparing weight
What tends to happen when comparing numbers is that values measured under different conditions end up side by side in the same table. Suppose, for example, that the weight given for sword A is with the blade housed in its koshirae, while the weight given for sword B does not state what was weighed. In that case, looking at which number is larger will not tell you which blade is heavier.
The same applies to length: check the measurement's endpoints and whether the same standard is used. For an explanation of length, see Types and Lengths.
What to confirm with the seller
If you are considering a purchase and want to use weight as one of the factors in your decision, asking the seller the following three questions will give you a basis for comparison with other candidates.
What was included in the weighing for the stated weight
Whether the figure includes a scabbard and, if so, whether it is a shirasaya or a koshirae
What accessories there are
If no weight is recorded, include the same three points when requesting it so that the measurement conditions are clear. Weight contributes to the impression in hand, but does not determine assessment or price by itself. Other checks are summarized in Checks before Purchase.
Nie and nioi describe differences in how the fine particles forming the temper pattern appear. According to the Japanese Sword Museum Technology Research Foundation, nie particles are easier to distinguish with the naked eye, while the finer particles of nioi resemble frosted glass (Japanese Sword Museum Technology Research Foundation). Nioi refers to appearance, not fragrance. Nor do the terms rank one above the other. For an overview, see Viewing Hamon and Jigane.
The “Shape” and the “Particles” of the Hamon Are Separate Yardsticks
Hyōgo Prefectural Museum of History presents two separate classifications. Suguha and midareba classify the shape of the temper pattern. Nie-deki and nioi-deki classify whether the particles forming it are predominantly nie or nioi (Hyōgo Prefectural Museum of History).
For that reason, avoid linking them as “suguha, therefore nioi” or “midareba, therefore nie.” For each sword, ask two questions. Is the shape suguha or midareba? Can the particles be seen one by one, or do they appear gathered together like mist? For example, write them in two separate columns as follows.
Shape: midareba (explanatory text) / Particles: fine glittering points were visible along the edge of the hamon (observation)
Shape: suguha (as stated in the explanatory text) / Particles: looks like a white, hazy band (how it appeared to me)
If you keep shape and particles in separate columns, you can note down any sword you encounter without strain, whatever the combination.
Comparing Under Matching Conditions
How the particles appear changes greatly with the lighting, the viewing angle, and the distance. When comparing, we suggest matching the conditions.
First read whether the exhibition text includes terms such as “nie-deki” or “nioi-deki.”
In the same gallery, look at two or more swords, keeping your standing position and eye level as consistent as possible.
Once you can see the particles on one sword, move to the other while keeping the same distance. Compare the differences in the size of the particles and in how they cluster.
The lighting in a display case has been adjusted by the museum to show the work. Do not shine a flashlight on a sword or move one without permission. Comparing within the conditions provided makes it easier to tell whether a difference comes from your own eyes or from the works themselves.
When the Particles Cannot Be Seen in a Photograph
In photographs on the web or in catalogues, the fine detail of the particles often does not show. Depending on the resolution and how the light was directed when the photograph was taken, nie may not appear at all. The fact that no particles are visible in a photograph does not mean that the sword has no nie. Use photographs to grasp the shape of the hamon. As for how the particles appear, confirm it through the wording of the exhibition text and on occasions when you can see the actual sword. Dividing the roles in this way makes confusion less likely. Note also that the appearance of the particles alone does not determine a sword's period, maker, or value.
Ōtachi is a term for an exceptionally long, large sword. Simply remembering it as a “long sword,” however, leaves little to say when viewing an object or photograph. Look at blade width and the extension of the point as well as length. This makes the impression of size easier to describe as form, or sugata. For an overview of the classification into tachi, uchigatana, wakizashi and tantō, see Japanese Sword Types and Lengths.
The Form of the Ōtachi as Seen in an Example at the Tokyo National Museum
The National Institutes for Cultural Heritage database records Tokyo National Museum's Important Cultural Property titled 大太刀 銘備前国長船兼光 延文二二(四)年二月日 (F-19995). Made in 1359, it has a blade length of 93.0 cm and curvature of 3.2 cm. Its broad blade and greatly extended point are described as a typical Nanbokuchō form (National Institutes for Cultural Heritage object page).
What deserves attention is that this explanation does not end with the length figure alone but also touches on the mihaba and the kissaki. Thinking of the impression of size as arising from the combination of three things (length, width, and tip) broadens the way you look.
Do Not Compare Length by the Size of the Photograph
Photographs in catalogues and on the web differ in scale from work to work. A sword that fills the frame looks long, and a sword in a photograph with wide margins tends to look short. Suppose, for example, that a photograph of a 93.0 cm work and one of a shorter sword are placed side by side at the same width. In this case, the two swords will appear to be the same length on the screen. Compare length not by size on the screen but by the figures given in the object data or the exhibition commentary.
Separating the Roles of the Table of Dimensions and the Full-Length Photograph
The table of dimensions and the full-length photograph are good at different things. We suggest using each in the following order.
Copy down the figures for length and curvature from the table of dimensions or the commentary. Note the source of the figures along with them.
Do not measure length from the full-length photograph. Instead, look at proportions and curves, such as the balance between the mihaba and the length and the position where the curvature appears strongest.
Move your eyes to the kissaki and note whether it appears long and extended or short and compact.
For the example above, this can be summarized in one line as follows.
“Length 93.0 cm, curvature 3.2 cm (object data) / wide mihaba, greatly extended kissaki (wording of the commentary) / my own impression: __”
Keep the column for figures and the column for words separate. That way, even when photographs of different scales are mixed in, the material for comparison is less likely to waver.
The Scope of What Can Be Understood from Form
What this way of looking can tell you goes only as far as tendencies in shape (sugata). Even if a sword's shape resembles examples from the Nanbokucho period, that alone does not determine another sword's period, maker, or value. Evaluating an individual sword requires specialist examination and the records of owners and museums. The more the size captures your attention, the more you should look at the figures and the form separately. That is the shortcut to reading the shape calmly.
When it comes to appreciating Japanese swords, one is tempted to begin by memorizing the names of the parts. But what works first is to stand back and see the overall shape as a single whole. The single curve the blade makes, the difference in thickness between the base and the tip, the way the tip comes together. Simply comparing these three makes the differences in character from sword to sword appear more clearly than you might expect.
“Sugata” Is Not the Sum of the Parts
Sword appreciation is described as considering the overall form, or taihai, together with details such as steel surface and temper pattern. Commentary also explains period tendencies in the position of curvature and the difference between width at the base and near the point (Hyōgo Prefectural Museum of History: Sword Form, Steel Surface and Temper Pattern).
What matters is the wording “there are tendencies.” One cannot declare from a single sword that, because the form is similar, it belongs to this period. Tendencies are like a map that emerges when many examples are set side by side, and individual works move freely across that map. While you are a beginner, I think it is enjoyable to use them not as a tool for guessing the date but as a yardstick for noticing differences.
What Is the Word Sori Looking At?
The word “curvature” (sori) tends to be used loosely, but viewing guides specify where it is measured. Imagine a straight line between the munemachi, the spine-side notch at the blade–tang boundary, and the point; then measure the greatest distance between that line and the spine (Kyoto National Museum: Japanese Sword Viewing Points).
All you can do at the venue is draw this line in your head. You will not actually hold a ruler up to the sword, and measuring an on-screen photograph with a ruler does not yield a meaningful number either. This is because photographs are not uniform in shooting conditions or in the size at which they are published, so a length on screen cannot be converted into an actual dimension. Check the figures in the museum’s official information, and use your eyes for observing position: “roughly where does it look farthest from the straight line?”
Setting the Figures for Two Blades Side by Side
Let us set side by side two blades published by the Tokyo Fuji Art Museum, following the museum’s descriptions.
Item
Tachi, signed Ichi (一)
Katana, signed Nagasone Okisato Nyūdō Kotetsu (長曽祢興里入道乕徹)
Museum’s description (school / province)
Fukuoka Ichimonji (school)
Musashi (province name)
Period
Mid-Kamakura period (13th century)
Early Edo period (17th century)
Blade length
72.0cm
70.5cm
Curvature
2.2cm
1.5cm
Museum’s explanation of the form
Wide, with a pronounced koshi-zori. The chū-kissaki (medium point) is compact, becoming ikubi
Note that the photographs shown in this article are not to the same scale, so actual dimensions cannot be compared by their lengths on screen.
The difference in blade length is only 1.5 cm, but the sori is 2.2 cm and 1.5 cm, which is quite different as a proportion. What should not be overlooked here is that the term koshi-zori appears in both explanations. One cannot simply sort them, with the deeper sori as koshi-zori and the shallower one as some other type. The depth of the sori and the position where the sori appears most strongly are two observations that should be made separately.
The Balance of Base and Tip Widths and the Kissaki
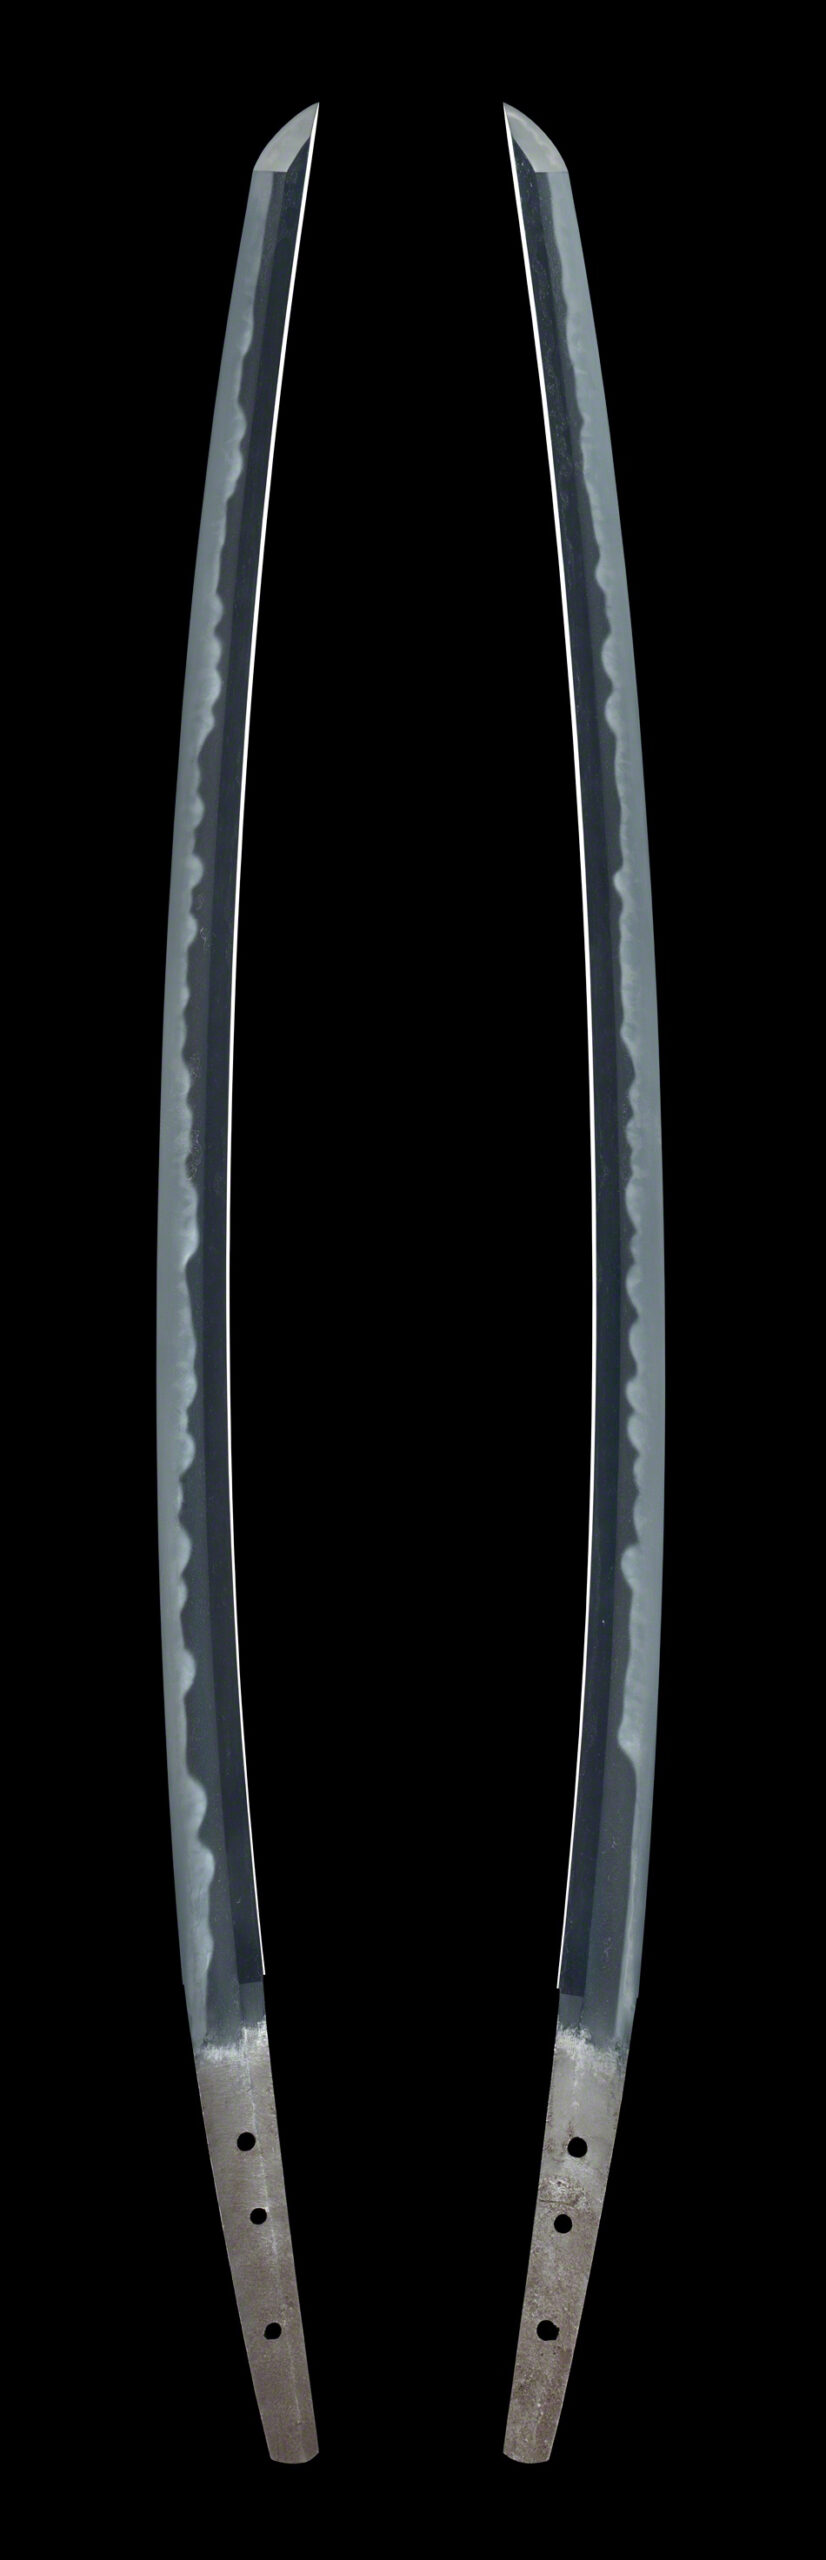
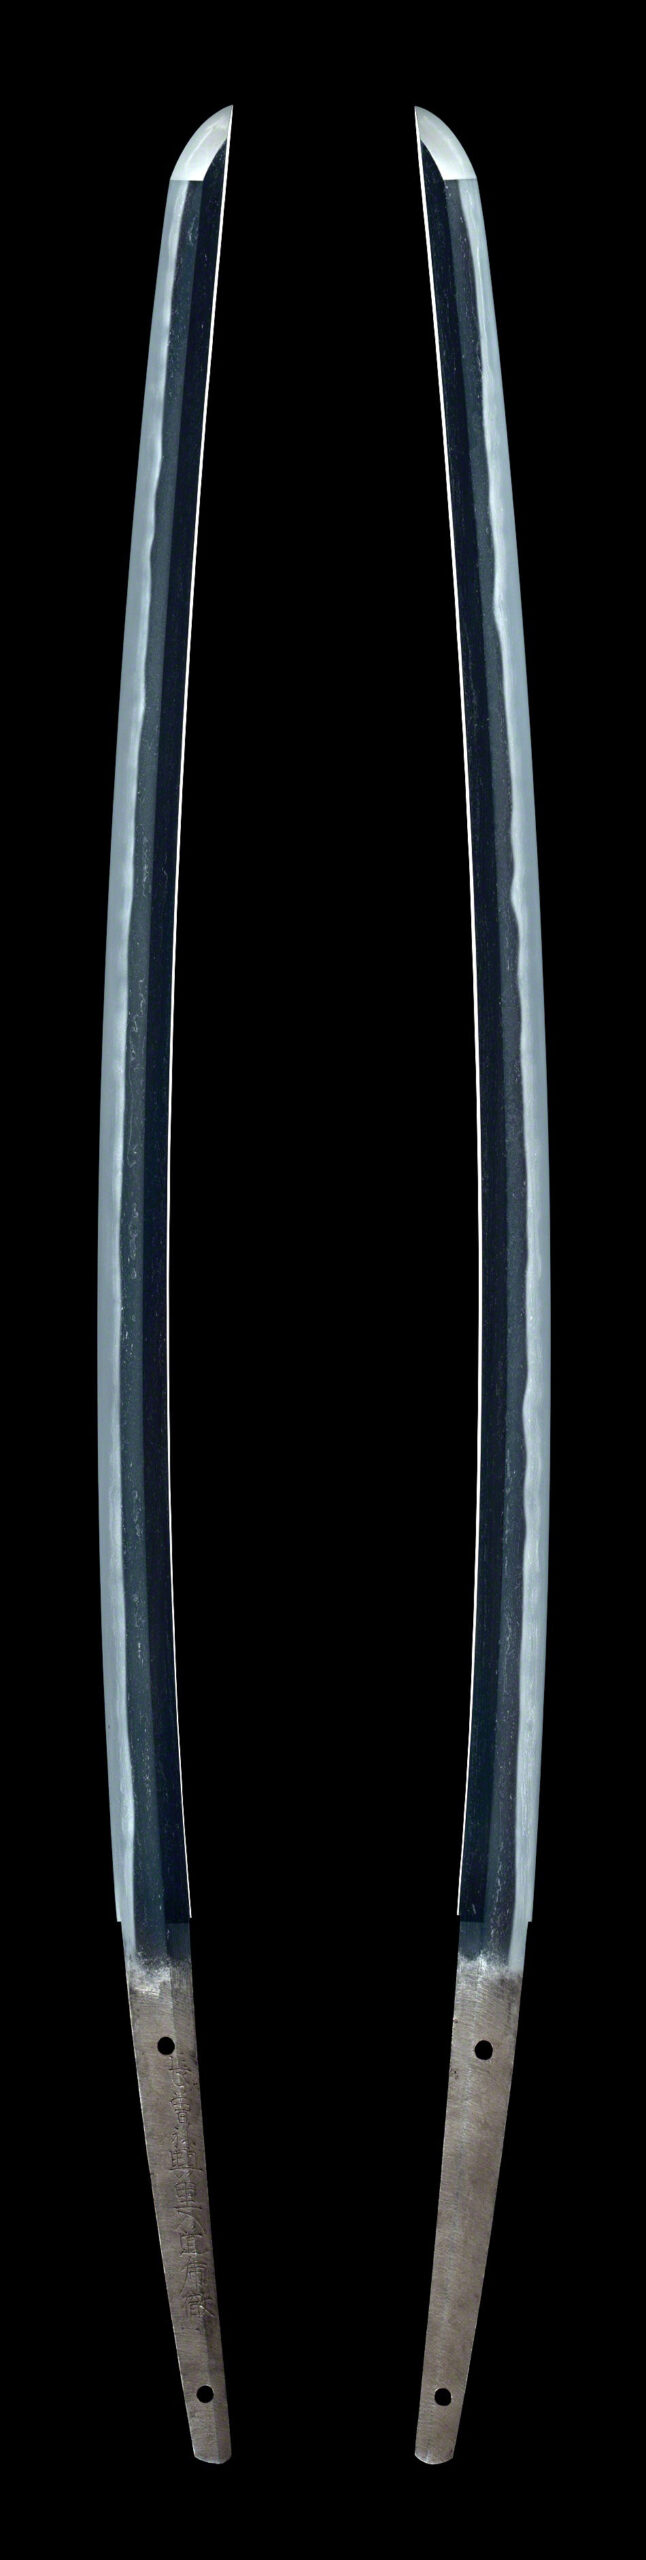
Visible in the photographs: two faces of the same tachi. The blade is broad, the temper pattern forms small successive waves, and the point is compact. There are three holes in the tang. Museum record: Fukuoka Ichimonji, middle Kamakura period, 13th century; blade length 72.0 cm, curvature 2.2 cm. Described as broad, with pronounced base curvature and a compact chū-kissaki forming an ikubi point. Important Cultural Property. Source: Tokyo Fuji Art Museum (CC0). Tokyo Fuji Art Museum Collection (CC0) / Collection RecordVisible in the photographs: two faces of the same katana. Overall curvature is shallow, with a gently undulating temper pattern and an inscription on the tang. Museum record: Musashi, early Edo period, 17th century; blade length 70.5 cm, curvature 1.5 cm. Described as shallowly curved with slight base curvature. Source: Tokyo Fuji Art Museum (CC0). Tokyo Fuji Art Museum Collection (CC0) / Collection Record
When comparing the two photographs, first look at the width at the base, and then follow with your eyes how the width changes toward the tip. One is wide, with a kissaki at the tip that appears short and compact. The other is slender overall, with a gentle peak to its curvature. If you check how these differences in impression connect with the museum's text, the words become your own.
Work around the Kanbun era in the early Edo period is described as tending toward shallow curvature and a blade that narrows from base to point (Japanese Sword Museum: History). This is a tendency, however, not a basis for dating or authenticating an individual sword from its form alone. For period terminology, also see Kotō, Shintō and Shinshintō: The Differences.
Points to Note When Viewing Photographs, and the Order of Viewing
Each of the two photographs above shows the front and back of the same single blade placed side by side. Although two sides appear next to each other, these are not two blades. For the figures, please refer to the official information in the table.
As an order of viewing, we recommend the following flow: (1) step back and trace the whole curve; (2) compare the width at the base and at the tip; (3) look at how the kissaki comes together; and (4) only then move down to details such as the jigane and the hamon. In your observation notes, simply writing down two items, “whether the peak of the curvature is toward the base or around the middle” and “whether the width decreases sharply or gradually,” will give you material for comparison with the next blade.
Looking at overall form is a way to describe a work's character in your own words, rather than simply classify it. For examining details, also see Enjoying Japanese Swords.